I Built a Full Oracle APEX App Without Dragging a Single Component
How APEXlang, SQLcl, VS Code, and Oracle AI Database are turning low-code development into a versionable, automatable, AI-assisted engineering workflow
Low-code development has traditionally followed a very visual pattern: Open a builder. Drag a component onto a page. Configure its properties. Repeat.
That model is still incredibly productive. But it is no longer the only way to build low-code applications.
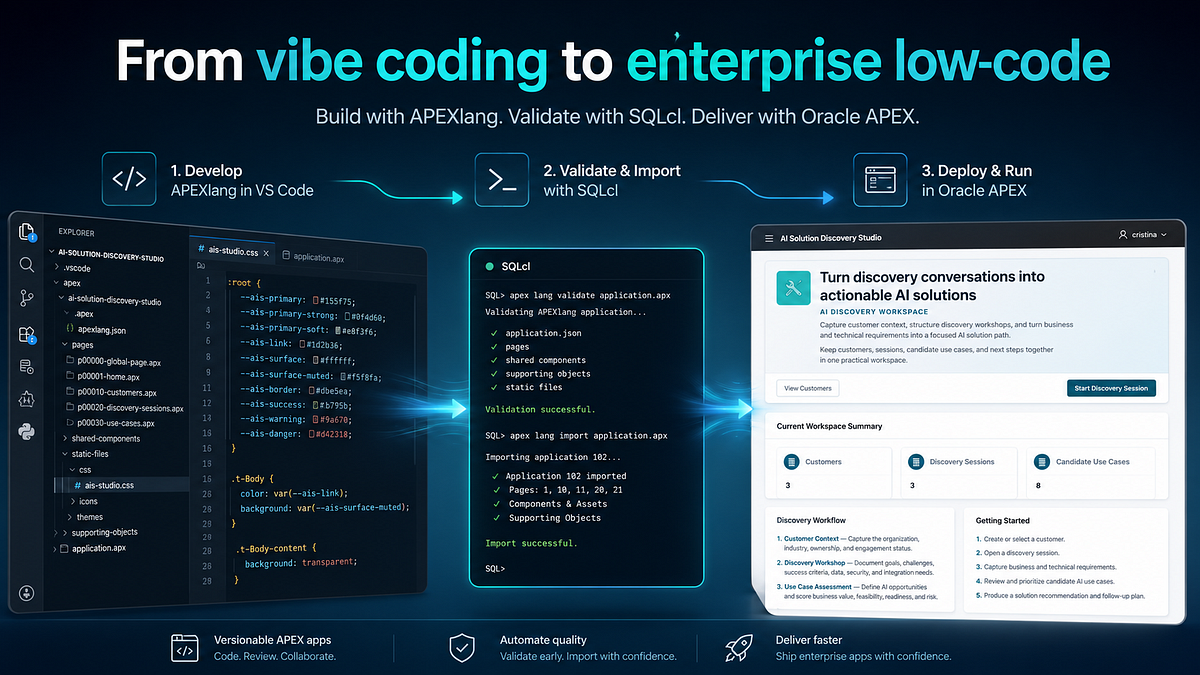
With Oracle APEX 26.1 and APEXlang, I was able to define an entire Oracle APEX application from Visual Studio Code, validate it through SQLcl, import it into APEX, and iterate on its pages, reports, forms, navigation, buttons, and visual design without manually dragging every component into place.
This goes far beyond generating a mock-up with AI.
It is a shift from vibe coding a prototype to building a real, database-backed enterprise application using a declarative language that can be reviewed, validated, versioned, and automated.
In this article, I will explain:
- what APEXlang is
- how I configured Oracle Autonomous Database, APEX, SQLcl, Java, and VS Code
- how I created and imported my first application
- how I automated the edit–validate–import workflow
- what worked well
- what still required real APEX knowledge
- and why this changes the way we should think about low-code development
The real breakthrough: low-code is becoming code
Oracle APEX has always offered a declarative development model.
When you create a region, report, form, button, validation, or process in Page Designer, you are not usually writing all the underlying HTML, JavaScript, SQL, and PL/SQL yourself. You configure metadata, and APEX turns that metadata into a working application.
APEXlang exposes that declarative model as a readable text-based language.
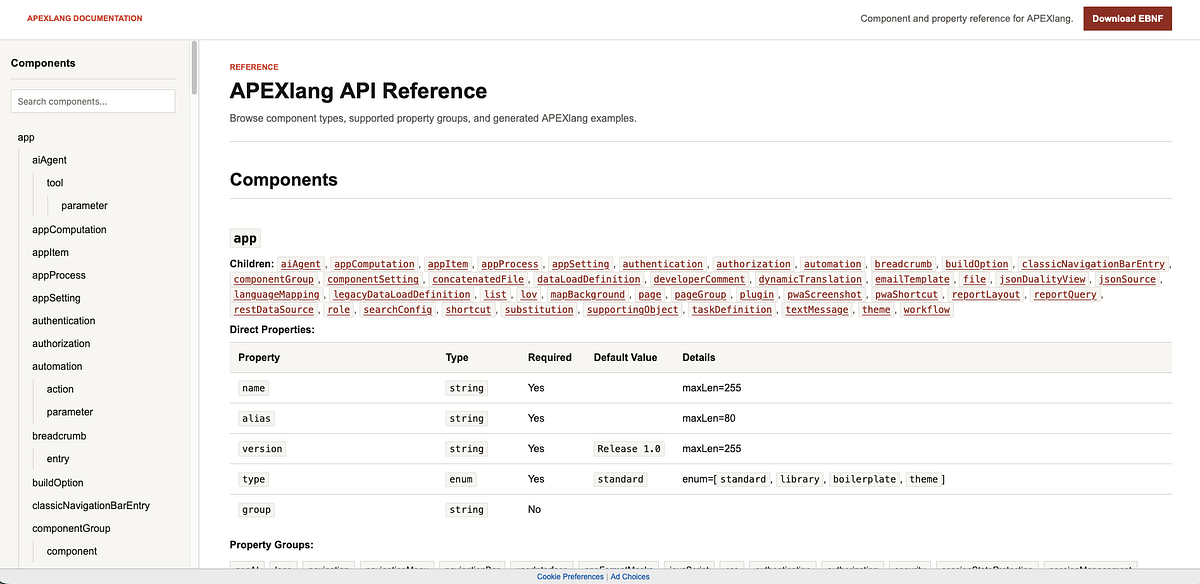
Check the APEXlang API Reference here: https://docs.oracle.com/en/database/oracle/apex/26.1/apxln/
That means an APEX application can now be represented as a collection of files containing components such as:
- pages;
- regions;
- interactive reports;
- forms;
- page items;
- buttons;
- lists of values;
- branches;
- navigation entries;
- validations;
- shared components;
- and application-level configuration.
This matters because text-based application definitions can participate in modern engineering workflows.
They can be:
- stored in Git;
- reviewed through pull requests;
- compared through diffs;
- edited from VS Code;
- validated automatically;
- generated or refactored with AI assistants;
- imported through scripts;
- and integrated into delivery pipelines.
The result is not traditional hand-written application code, but it is no longer purely visual development either.
I would describe it as:
Low-code as code.
Why this is bigger than “AI generated an app”
There is already plenty of excitement around using generative AI to create websites, prototypes, and application interfaces.
But enterprise applications need more than an attractive screen.
They need:
- persistent data;
- relationships between business entities;
- validations;
- controlled insert, update, and delete operations;
- authentication;
- navigation;
- session state;
- reusable lists of values;
- deployment controls;
- error handling;
- and maintainability.
My objective was therefore not to generate a pretty mock-up.
I wanted to determine whether I could use an AI-assisted workflow to build a real Oracle APEX application, backed by Oracle AI Database, while keeping the application definition in local APEXlang files.
The answer was yes.
But the experience also taught me where APEX knowledge remains essential.
The application: AI Solution Discovery Studio
For my first project, I created an application called:
AI Solution Discovery Studio
The application is designed to structure AI discovery workshops with customers.
The goal is to turn conversations, business challenges, technical constraints, and solution requirements into structured information that can later support:
- use-case assessment;
- prioritization;
- solution architecture;
- implementation planning;
- and follow-up actions.
I deliberately chose this use case because it is more realistic than a simple task manager or employee directory.
It also requires several fundamental APEX capabilities.
The first version contains:
- Home;
- Customers;
- Customer Form;
- Discovery Sessions;
- Discovery Session Form.
The underlying data model also prepares the application for future modules such as:
- candidate AI use cases;
- connected systems;
- business-value scoring;
- technical feasibility;
- data readiness;
- risk;
- recommended Oracle architecture;
- and action planning.
What the application captures
Customers
The Customers module stores the organizations participating in discovery engagements.
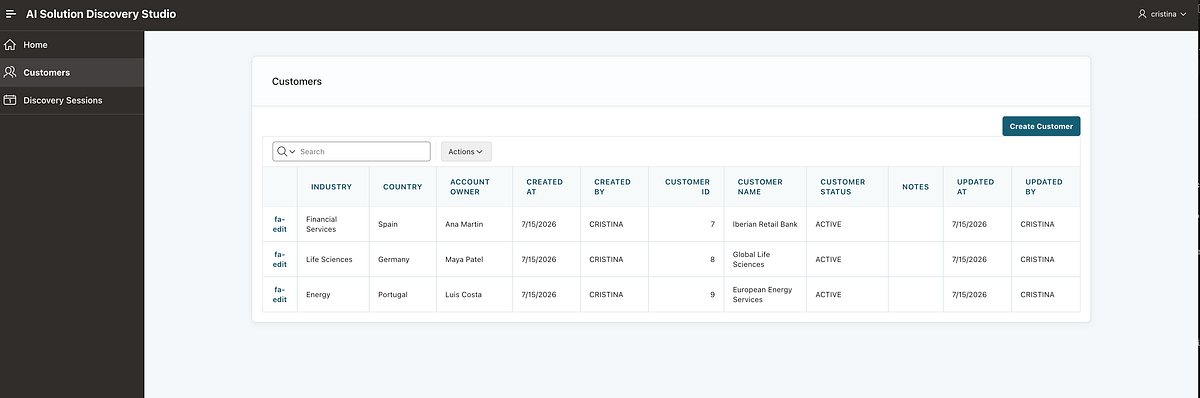
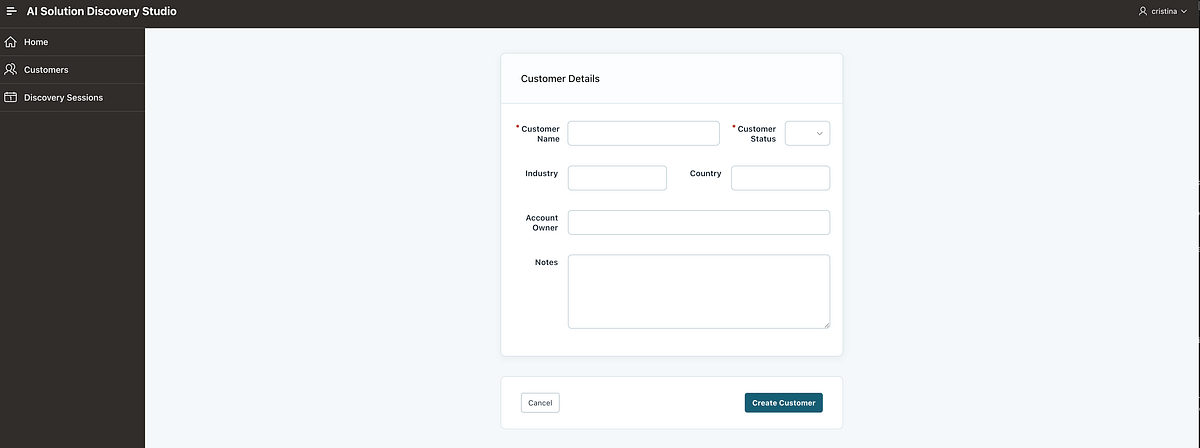
Typical attributes include:
- customer name;
- industry;
- country;
- account owner;
- engagement status;
- notes;
- created and updated timestamps.
The report displays existing customers and provides navigation to create or edit them.
Discovery Sessions
Each discovery session is associated with a customer.
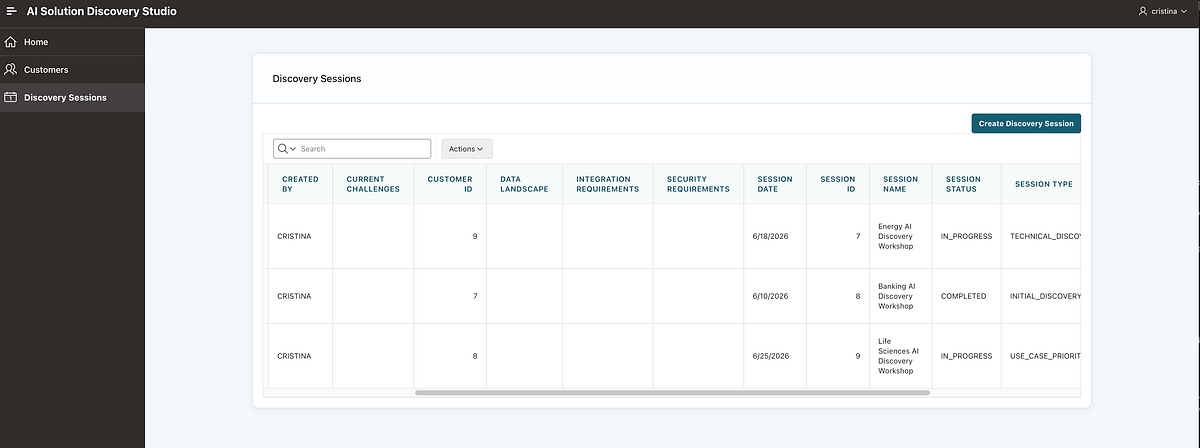
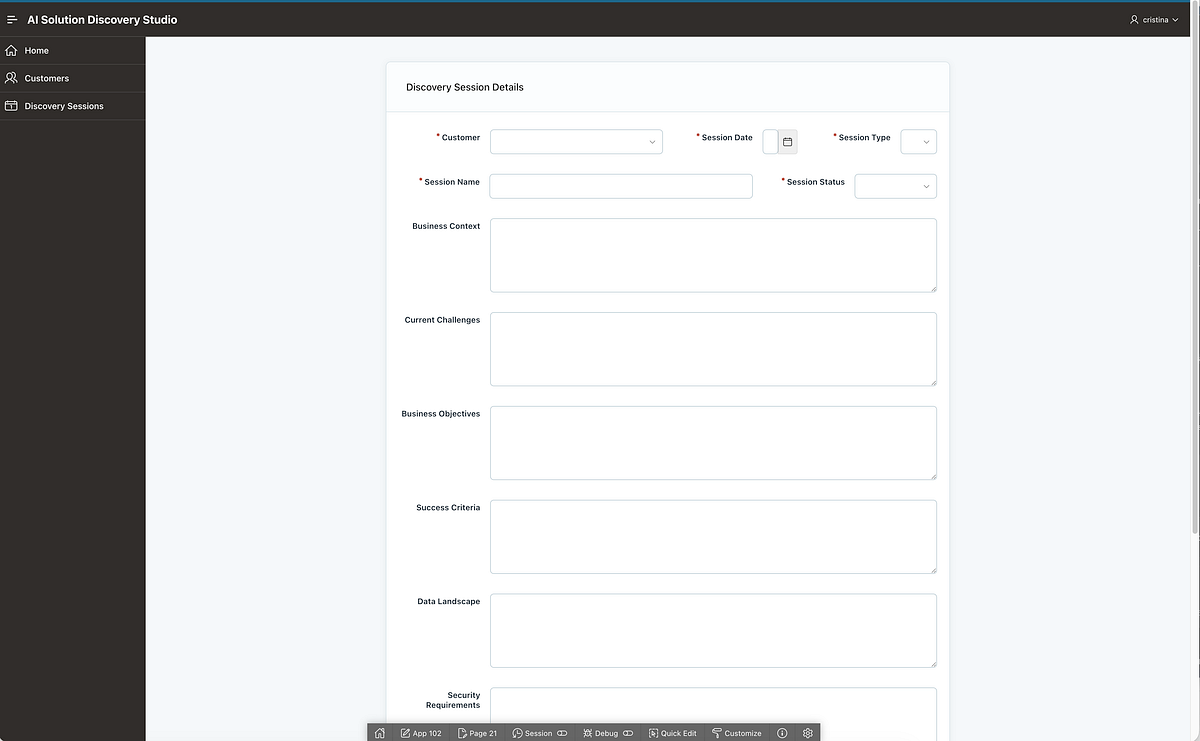
The form captures information such as:
- session name;
- session date;
- session type;
- session status;
- business context;
- current challenges;
- business objectives;
- success criteria;
- data landscape;
- security requirements;
- integration requirements.
This structure mirrors the information normally collected during an AI solution discovery workshop.
Suggested diagram:
Customer → Discovery Session → Candidate Use Cases → Solution Design → Action Plan
The development stack
My local environment included:
- Oracle AI Database / Autonomous Database;
- Oracle APEX 26.1;
- APEXlang;
- SQLcl;
- Java;
- Visual Studio Code;
- Oracle SQL Developer extension for VS Code;
- Git;
- and an AI coding assistant operating inside the local project.
The workflow looked like this:
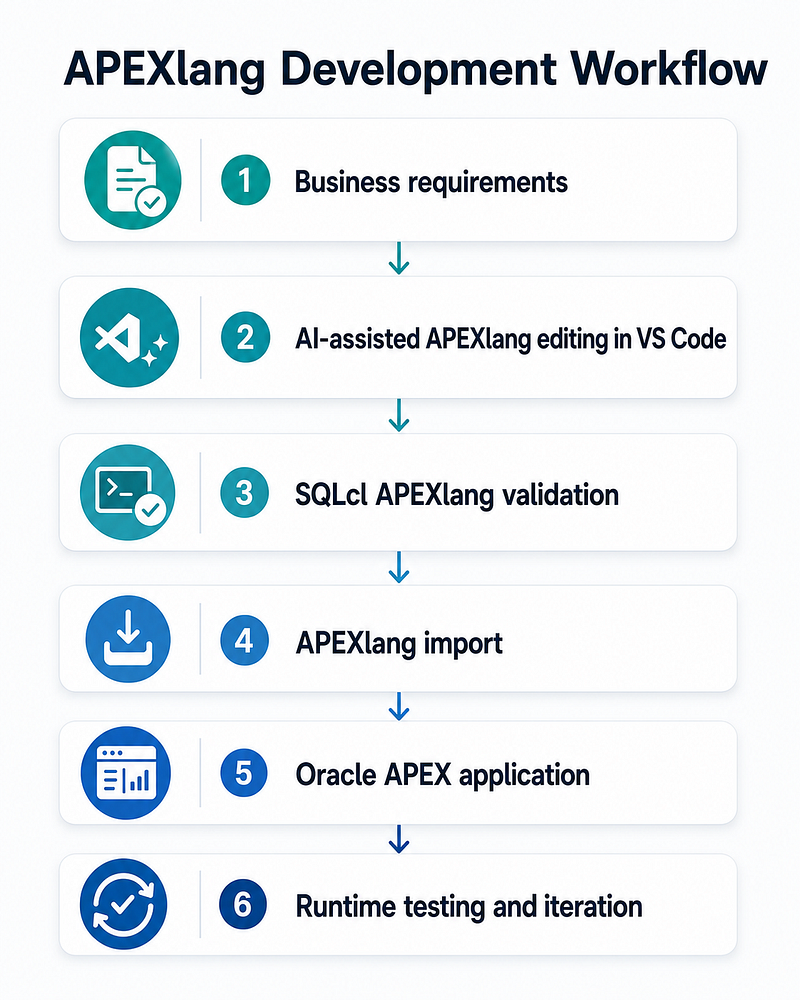
Step 1: Prepare Java
SQLcl requires Java, so the first check is straightforward:
java -version
A valid response confirms that Java is available.
The exact supported version may depend on the SQLcl release you install, so verify compatibility for your environment. You can download sqlcl here: https://www.oracle.com/database/sqldeveloper/technologies/sqlcl/download/
Step 2: Install SQLcl
SQLcl became the central command-line tool in the project.
I used it to:
- connect to Autonomous Database;
- run SQL scripts;
- inspect APEX metadata;
- export an application as APEXlang;
- validate local APEXlang files;
- and import application changes.
After downloading and extracting SQLcl, I could launch it with a command similar to:
$HOME/Downloads/sqlcl/bin/sql
You can confirm the installation with:
$HOME/Downloads/sqlcl/bin/sql -version
For a permanent setup, you can add its bin directory to your shell PATH.
For example:
export PATH="$HOME/Downloads/sqlcl/bin:$PATH"
And to persist it in Zsh:
echo 'export PATH="$HOME/Downloads/sqlcl/bin:$PATH"' >> ~/.zshrc
source ~/.zshrc
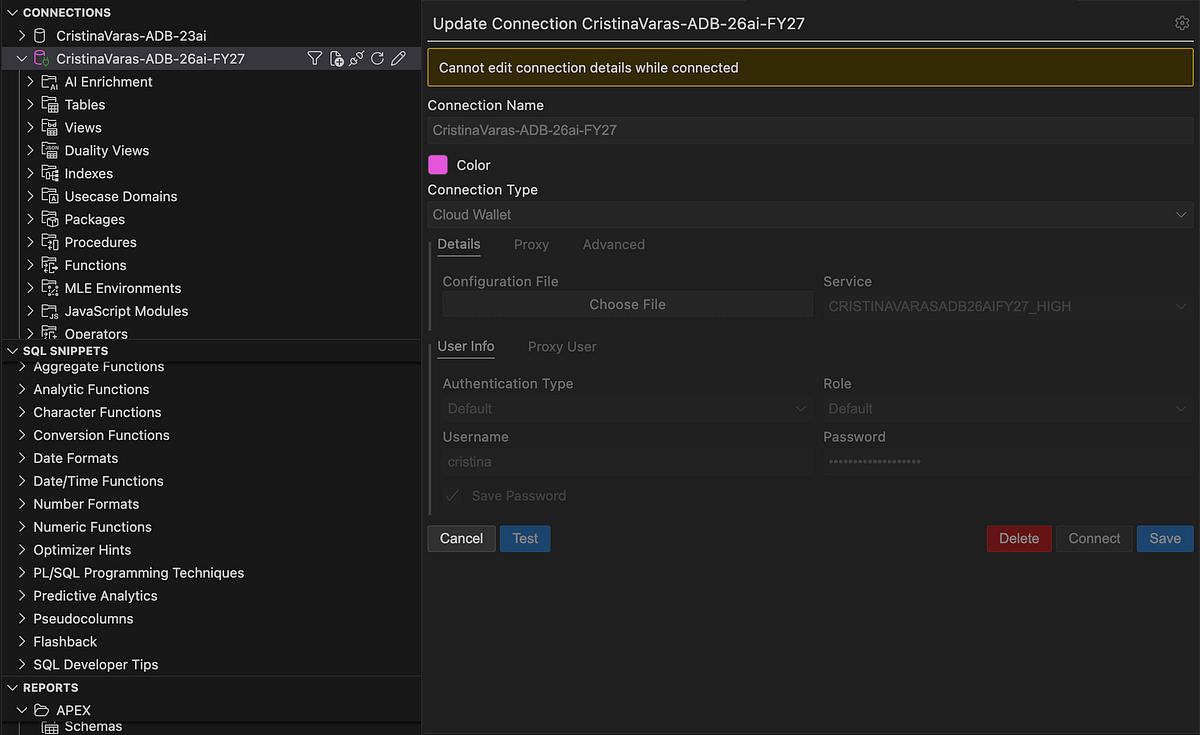
Step 3: Configure the Autonomous Database connection
The next requirement is a working connection to Autonomous Database.
My application used:
- an APEX workspace;
- a parsing schema;
- and a saved SQLcl connection pointing to the Autonomous Database service.
A stored SQLcl connection makes the workflow much easier because scripts can reference a friendly name instead of reproducing the full connection configuration every time.
You can list stored connections with:
CONNMGR LIST
And inspect one with:
CONNMGR SHOW "YOUR_CONNECTION_NAME"
A typical result includes:
- connection name;
- database user;
- connect string;
- password status;
- TNS configuration location;
- and connection properties.
Step 4: Configure TNS correctly
Autonomous Database connections usually depend on wallet or TNS configuration.
One issue I encountered was that SQLcl attempted to resolve the TNS alias from the wrong directory.
The saved connection metadata pointed to a directory similar to:
/Users/<user>/.dbtools/connections/<connection-id>
That directory contained the relevant tnsnames.ora.
I therefore configured TNS_ADMIN:
export TNS_ADMIN="/Users/<user>/.dbtools/connections/<connection-id>"
To persist it in Zsh:
echo 'export TNS_ADMIN="/Users/<user>/.dbtools/connections/<connection-id>"' >> ~/.zshrc
source ~/.zshrc
This allowed SQLcl to resolve the Autonomous Database service alias correctly.
Step 5: Save the SQLcl password for automation
Initially, every validation required an interactive password prompt.
That works during manual testing, but it prevents an AI coding agent or shell script from completing the workflow automatically.
The saved connection initially showed:
Password: not saved
Once the password was securely stored with the connection, SQLcl could run non-interactively.
That enabled the coding agent to execute:
- validation;
- corrections;
- validation again;
- import;
- read-only post-import verification.
This was a major productivity improvement.
However, I kept some important boundaries.
Automated
- APEXlang validation;
- repeated correction cycles;
- application import into the development application;
- metadata verification;
- Git diff checks.
Kept manual
- business-data inserts, updates, and deletes;
- runtime user-experience review;
- visual approval;
- Git commits;
- promotion to another environment.
That balance provided automation without giving up control.
Step 6: Confirm the APEX workspace and parsing schema
Before generating or importing applications, confirm that the schema is associated with the expected APEX workspace.
A useful query is:
select
    workspace_id,
    workspace_name,
    schema
from apex_workspace_schemas
where schema = 'YOUR_SCHEMA';
This seems simple, but it is important.
You can create database objects successfully and still have confusing APEX behavior if:
- the application uses a different parsing schema;
- the workspace is not mapped to the schema;
- or the application is imported under the wrong context.
I also verified the application metadata:
select
    application_id,
    application_name,
    alias,
    owner
from apex_applications
where application_id = 102;
In my case, the application used a fixed Application ID so that every import updated the same application instead of creating duplicates.
Step 7: Create the database foundation
Before building the interface, I created the database objects.
The project eventually included:
- application tables;
- views;
- triggers;
- constraints;
- indexes;
- a scoring package;
- and fictitious seed data.
For a smaller experiment, you only need two tables.
Example: Customers
create table ais_customers (
    customer_id       number generated by default as identity primary key,
    customer_name     varchar2(200) not null,
    industry          varchar2(100),
    country           varchar2(100),
    account_owner     varchar2(200),
    customer_status   varchar2(30) not null,
    notes             varchar2(4000),
    created_at        timestamp default systimestamp not null,
    updated_at        timestamp default systimestamp not null
);
Example: Discovery Sessions
create table ais_discovery_sessions (
    session_id                number generated by default as identity primary key,
    customer_id               number not null,
    session_name              varchar2(200) not null,
    session_date              date,
    session_type              varchar2(50),
    session_status            varchar2(30),
    business_context          varchar2(4000),
    current_challenges        varchar2(4000),
    business_objectives       varchar2(4000),
    success_criteria          varchar2(4000),
    data_landscape            varchar2(4000),
    security_requirements     varchar2(4000),
    integration_requirements  varchar2(4000),
    created_at                timestamp default systimestamp not null,
    updated_at                timestamp default systimestamp not null,
    constraint ais_sessions_customer_fk
        foreign key (customer_id)
        references ais_customers (customer_id)
);
The exact data model is not the important part.
The key principle is:
Build and validate the database foundation before asking APEXlang to generate forms and reports against it.
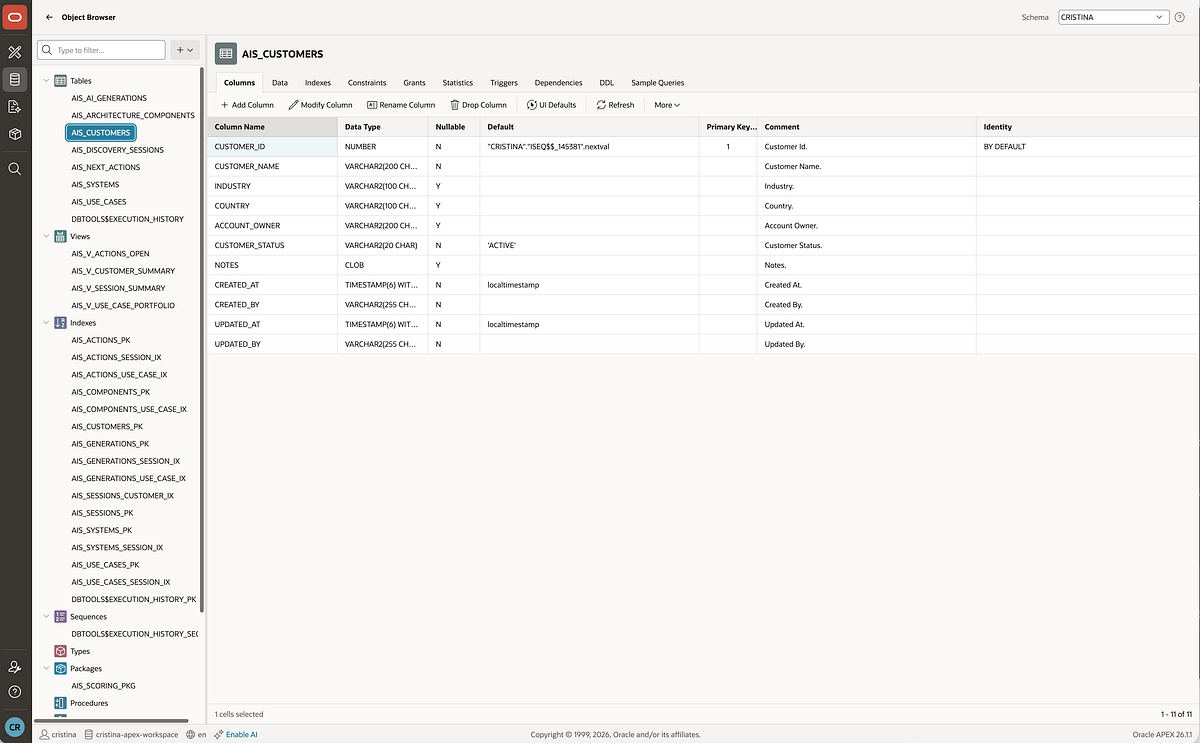
You can inspect the final objects with queries such as:
select table_name
from user_tables
where table_name like 'AIS_%'
order by table_name;
And verify seed data with:
select count(*) from ais_customers;
select count(*) from ais_discovery_sessions;
Step 8: Generate or export the APEXlang project
My application already existed in APEX, so I exported it in split APEXlang format.
Inside SQLcl:
apex export \
  -applicationid 102 \
  -exptype APEXLANG \
  -split \
  -dir ./apex/current-export
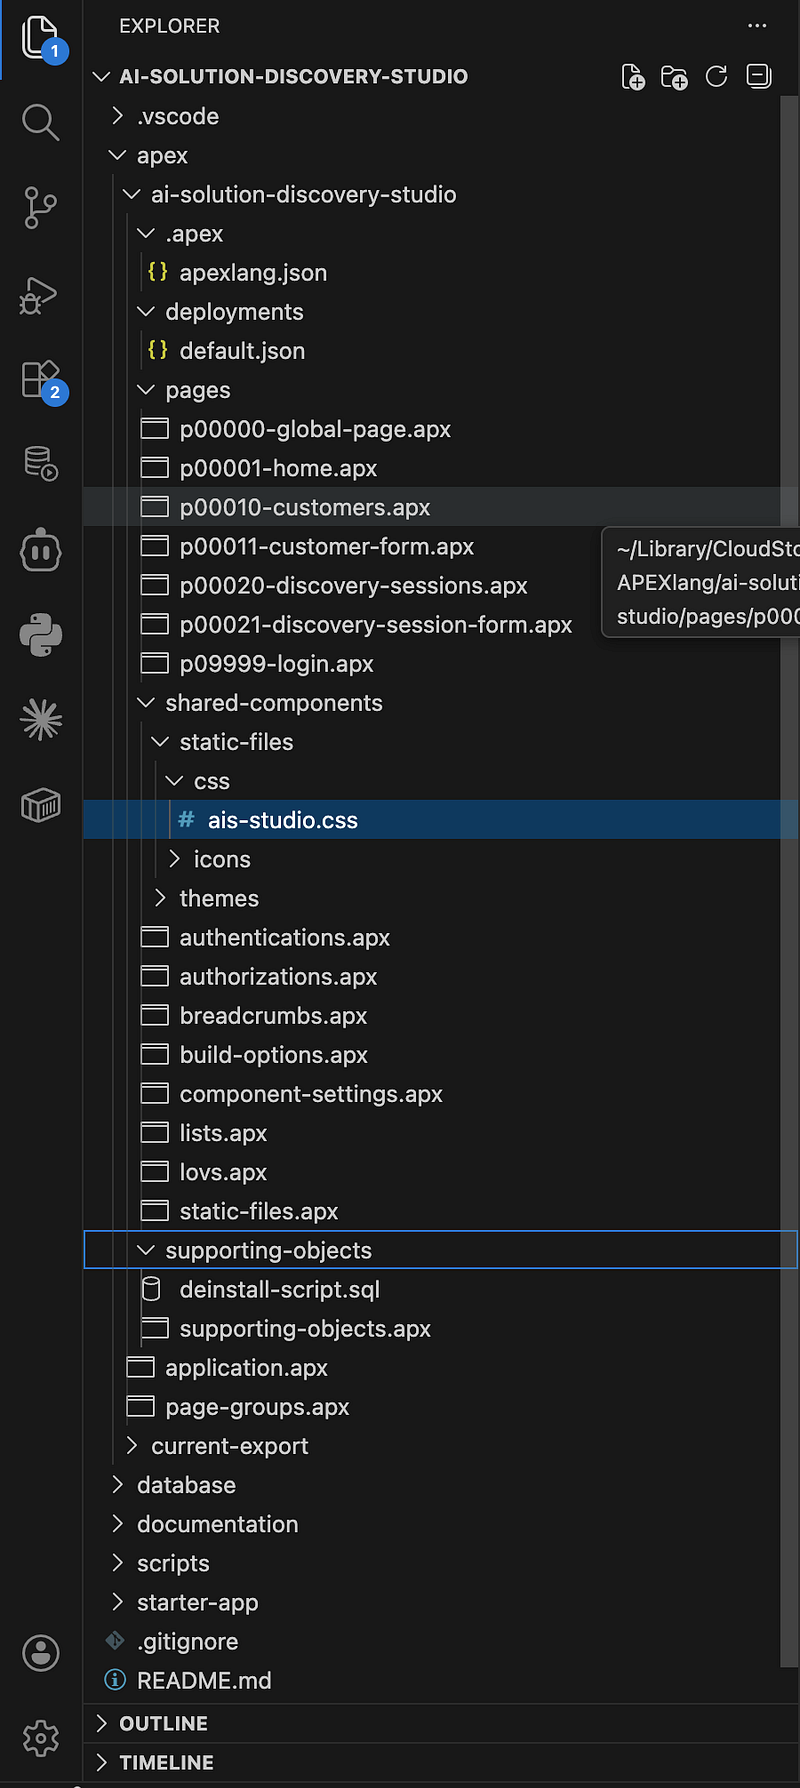
The split export produces a file structure that is much easier to inspect and version.
A simplified project structure looked like this:
ai-solution-discovery-studio/
├── apex/
│   ├── ai-solution-discovery-studio/
│   │   ├── application.apx
│   │   ├── deployments/
│   │   │   └── default.json
│   │   ├── pages/
│   │   │   ├── p00001-home.apx
│   │   │   ├── p00010-customers.apx
│   │   │   ├── p00011-customer-form.apx
│   │   │   ├── p00020-discovery-sessions.apx
│   │   │   └── p00021-discovery-session-form.apx
│   │   └── shared-components/
│   │       └── lovs.apx
│   └── current-export/
├── database/
├── documentation/
├── scripts/
└── README.md
Step 9: Keep the Application ID stable
The deployment configuration must target the expected application.
In my case, deployments/default.json contained:
{
  "id": 102
}
This ensured that imports updated Application 102 rather than generating another application.
This is one of the first things I would verify in any APEXlang workflow.
Step 10: Build the pages as APEXlang
The first functional module contained four pages:
10 — Customers
11 — Customer Form
20 — Discovery Sessions
21 — Discovery Session Form
I also updated Page 1 as a Home dashboard.
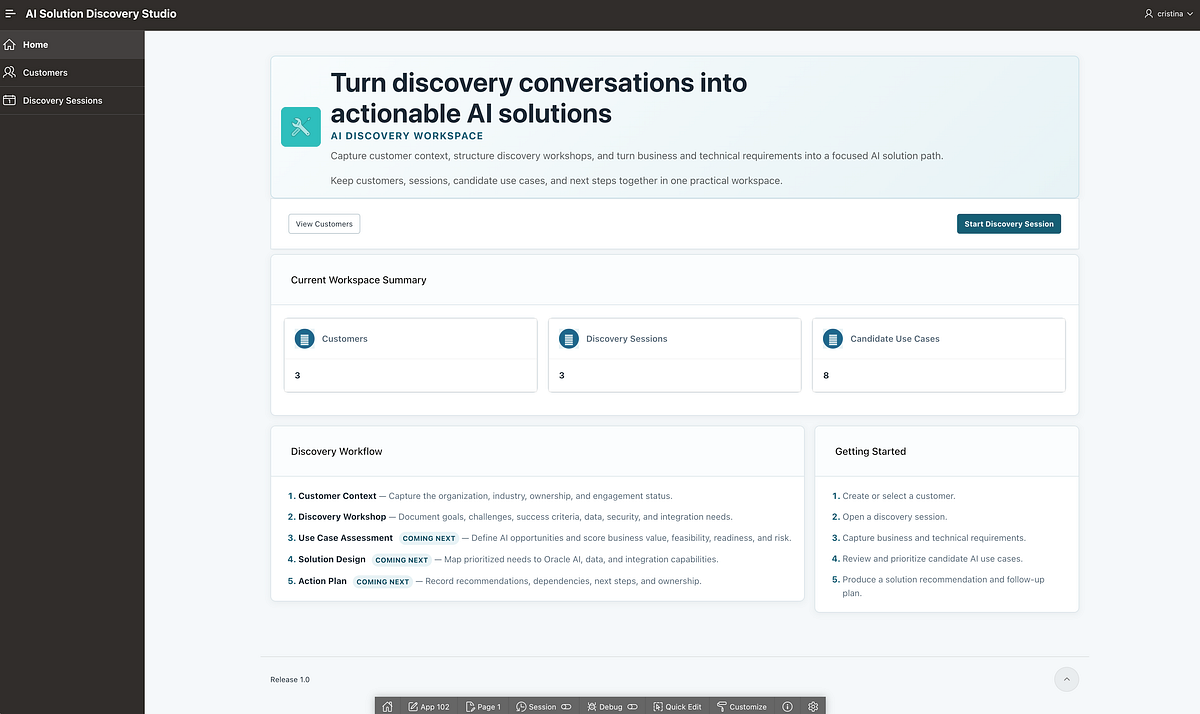
The local files defined:
- page metadata;
- report regions;
- form regions;
- table sources;
- page items;
- grid positions;
- shared LOV references;
- buttons;
- database actions;
- conditions;
- branches;
- navigation;
- and appearance.
This is the moment where the workflow starts to feel very different from traditional APEX development.
Instead of manually creating every page component, I could describe the expected result to the coding assistant and let it edit the APEXlang files.
For example, the requested Customer Form included:
- a native editable Form Region;
- a hidden primary key;
- mapped text fields;
- a shared status LOV;
- a textarea for notes;
- create, save, delete, and cancel buttons;
- visibility conditions;
- post-processing branches;
- and a responsive grid.
The same concept applied to Discovery Sessions.
But this did not mean blindly accepting generated output.
Every change still had to pass the actual APEXlang compiler.
Step 11: Validate APEXlang with SQLcl
Validation became the core feedback mechanism.
I created a script that runs the APEXlang validation command against the stored database connection.
The invocation looked like this:
./scripts/apexlang-validate.sh \
  --sqlcl-path "$HOME/Downloads/sqlcl/bin/sql" \
  --connection-name "YOUR_CONNECTION_NAME"
A successful result ended with:
Validation successful.
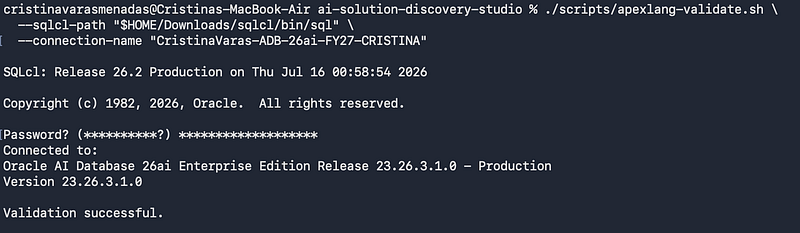
When the generated APEXlang was wrong, the compiler returned highly specific errors.
Examples included:
INVALID_PROPERTY
MISSING_REQUIRED_PROPERTY
LOV_NOT_FOUND
PLUGIN_NOT_FOUND
It also returned:
- file name;
- line;
- column;
- invalid property;
- and valid alternatives.
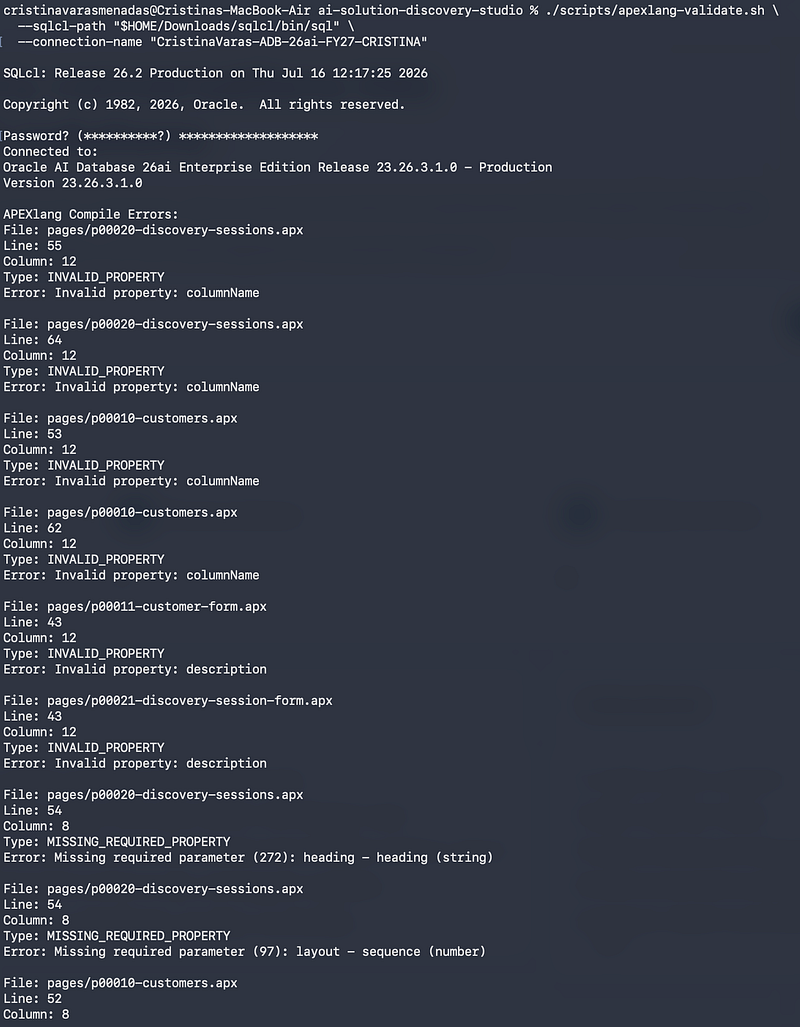
For example, the compiler could explain that:
- a property was not valid in that component;
- a required property was missing;
- a plugin name did not exist;
- or a region was using an unsupported slot.
That made it possible to use a repeatable correction loop:
AI edits APEXlang
        ↓
SQLcl validates
        ↓
Compiler returns precise errors
        ↓
AI fixes the files
        ↓
SQLcl validates again
This is where AI-assisted development becomes much more reliable.
The model is not just guessing what looks right. It is correcting its work against the real APEXlang compiler and the metadata supported by the target APEX instance.
Step 12: Import only after successful validation
Once validation succeeded, I imported the application.
./scripts/apexlang-import.sh \
  --sqlcl-path "$HOME/Downloads/sqlcl/bin/sql" \
  --connection-name "YOUR_CONNECTION_NAME"
A successful cycle produced:
Validation successful.
Import successful.
I then verified that the expected application and pages still existed:
select
    page_id,
    page_name
from apex_application_pages
where application_id = 102
order by page_id;
This confirmed that the application still contained the expected pages.
The principle is simple:
Never import generated APEXlang before validating it.
Automating the full edit–validate–import loop
Once the stored SQLcl connection worked without a password prompt, the coding agent could perform most of the development cycle.
The automated workflow became:
1. Edit APEXlang files
2. Run git diff --check
3. Run APEXlang validation
4. Parse compiler errors
5. Correct the files
6. Repeat until validation succeeds
7. Import the known application
8. Run read-only metadata checks
9. Stop before business DML or Git commit
A simplified shell script could look like this:
#!/usr/bin/env bash
set -euo pipefail
PROJECT_ROOT="$(cd "$(dirname "$0")/.." && pwd)"
SQLCL="${SQLCL_PATH:-$HOME/Downloads/sqlcl/bin/sql}"
CONNECTION="${APEX_CONNECTION:-YOUR_CONNECTION_NAME}"
cd "$PROJECT_ROOT"
git diff --check
./scripts/apexlang-validate.sh \
  --sqlcl-path "$SQLCL" \
  --connection-name "$CONNECTION"
./scripts/apexlang-import.sh \
  --sqlcl-path "$SQLCL" \
  --connection-name "$CONNECTION"
I would not necessarily use this script unchanged in production, but it demonstrates the principle.
The APEX application is no longer deployed through a sequence of manual UI operations.
It can participate in a controlled command-line workflow.
The most important lesson: valid does not always mean visually correct
One of the most valuable parts of this experiment was discovering that a technically valid application can still render poorly.
For example, my first imported forms had:
- regions in unsupported or ineffective template slots;
- buttons appearing between form fields;
- very small input controls inside wide grid columns;
- inline labels;
- textareas occupying most of the page;
- action buttons that existed in Page Designer but did not appear at runtime.
The APEXlang passed some stages of validation, but the user experience was not good.
This forced me to understand how APEX actually interprets:
- page positions;
- region slots;
- the 12-column grid;
- item width;
- label position;
- textarea rows;
- button containers;
- Universal Theme templates;
- and button display conditions.
The solution was not to abandon APEXlang.
The solution was to combine:
- compiler feedback;
- APEXlang documentation;
- the formal EBNF grammar;
- real APEX exports;
- Page Designer inspection;
- and runtime screenshots.
Page Designer still matters
The headline of this article says I built the app without dragging components.
That is true: the functional pages were defined locally and imported. But it does not mean Page Designer is obsolete. Page Designer became a diagnostic and learning tool.
It helped me inspect:
- whether a region was really in
Body; - how APEX represented the item grid;
- where buttons had been placed;
- whether form items were associated with the form region;
- and how imported metadata mapped back to visual components.
This is an important distinction:
APEXlang removes the requirement to build everything through drag-and-drop, but it does not remove the value of understanding the visual builder.
The two experiences complement each other.
Fixing native form processing
Another important lesson involved create, update, and delete operations.
The application uses native editable Form Regions rather than custom PL/SQL DML.
That requires the correct configuration of:
- form source table;
- primary key;
- mapped items;
- allowed operations;
- button request;
- database action;
- conditions;
- and post-processing branches.
The buttons were configured with the following semantics:
ButtonPage actionRequestDatabase actionVisibilityCancelRedirect — — AlwaysCreateSubmitCREATEInsertPrimary key is nullSaveSubmitSAVEUpdatePrimary key is not nullDeleteSubmitDELETEDeletePrimary key is not null
The first version also exposed a runtime branch error:
Show Only branches are not supported if the page attribute
“Reload on Submit” is set to “Only for Success”.
The final configuration used:
Reload on Submit: Always
This made it compatible with the post-processing branches returning users to the report pages.
This was a good example of why runtime testing remains necessary even after a successful APEXlang validation.
Fixing the report columns
The first version of the Customers report returned the expected database rows, but the only visible content was the literal text:
fa-edit
The query was working. The problem was the report-column metadata.
The correction involved:
- defining the visible columns through the Interactive Report’s saved report configuration;
- keeping the customer and session business fields visible;
- preserving a proper native link column;
- and ensuring the Font APEX icon rendered as an icon rather than plain text.
The final Customers report displayed:
- Customer Name;
- Industry;
- Country;
- Account Owner;
- Status;
- Created;
- Updated.
The Discovery Sessions report displayed:
- Customer;
- Session Name;
- Session Date;
- Session Type;
- Status;
- Created.
This illustrates an important debugging principle:
When an APEX report shows the correct number of rows but the wrong content, inspect the report-column configuration before assuming the SQL source is broken.
Adding a visual identity
After the application became stable, I moved to a global styling pass.
The goal was not to replace Universal Theme with a custom frontend framework.
Instead, I used:
- Universal Theme components;
- template options;
- application-level CSS;
- restrained CSS variables;
- consistent region classes;
- responsive grid behavior;
- and native Font APEX icons.
The design direction was:
- light neutral page background;
- white content surfaces;
- dark slate text;
- muted secondary text;
- teal accent;
- subtle borders;
- restrained shadows;
- medium border radii;
- compact action bars;
- generous but controlled spacing.
A global stylesheet is preferable to repeating inline styles across every page.
A simple design-token foundation can look like:
:root {
  --ais-page-bg: #f6f8fb;
  --ais-surface: #ffffff;
  --ais-surface-muted: #f8fafc;
  --ais-border: #e4e9f0;
  --ais-text: #172033;
  --ais-text-muted: #667085;
  --ais-primary: #147d87;
  --ais-primary-hover: #106872;
  --ais-radius-sm: 8px;
  --ais-radius-md: 12px;
  --ais-shadow-sm: 0 1px 3px rgba(16, 24, 40, 0.06);
}
The key was to keep the CSS conservative and let Universal Theme continue doing most of the work.
From prompting to controlled generation
The AI coding assistant was useful, but only after I gave it enough context.
The most effective prompts included:
- the exact project root;
- application ID;
- APEX version;
- SQLcl path;
- stored connection name;
- target page IDs;
- table names;
- exact item mappings;
- expected button behavior;
- validation command;
- import command;
- restrictions such as “do not commit” and “do not run business DML”.
Generic prompts such as:
Make the form look better
were less useful than structured instructions such as:
Keep the native Form Region, place fields in a 12-column responsive grid, move actions into a separate Buttons Container, validate using SQLcl, import only after validation succeeds, and do not change the database model.
AI-assisted APEXlang development works best when the model is treated as an engineering agent operating within explicit constraints.
A practical project rule for AI coding agents
I documented the workflow in the project so that future iterations followed the same rules:
## APEXlang workflow
After modifying APEXlang:
1. Run `git diff --check`.
2. Run the SQLcl APEXlang validation script.
3. Fix validation errors and repeat until validation succeeds.
4. Only after successful validation, import into the known Application ID.
5. Never create another application.
6. Never modify business data automatically.
7. Never commit automatically.
8. Report validation and import results.
9. Leave final runtime and visual approval to the user.
This reduces repeated instructions and makes the agent’s behavior more predictable.
The new development loop
The complete workflow now looks like this:
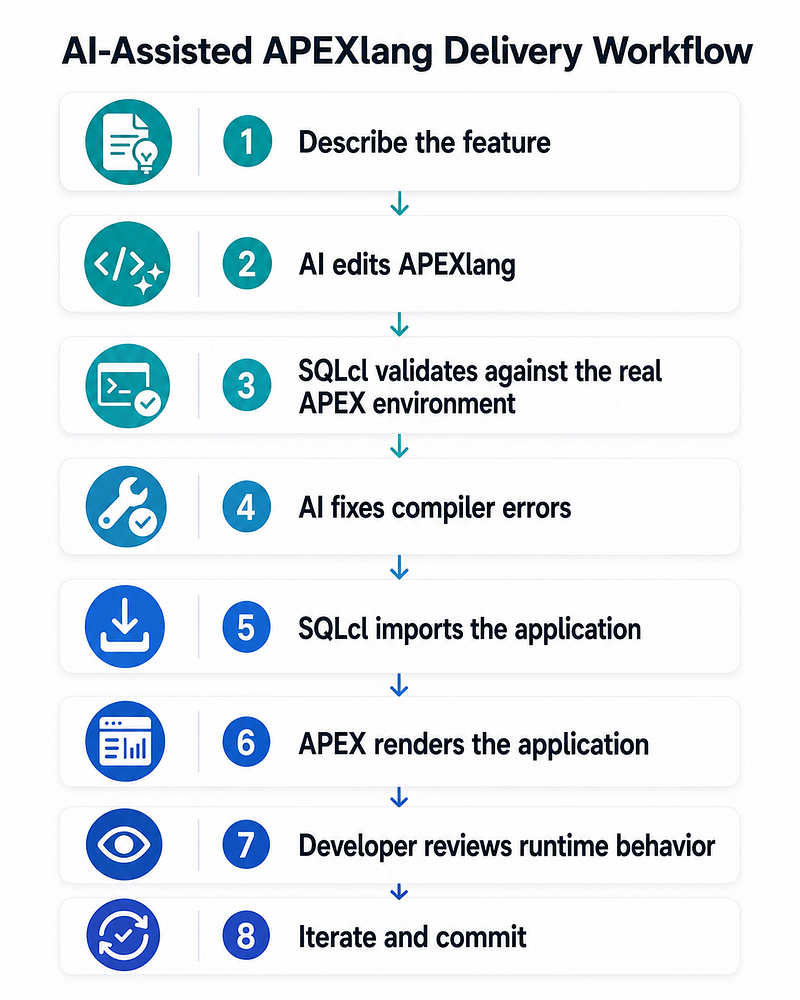
This is much closer to a modern application-development lifecycle than the traditional idea of manually assembling every page through a visual editor.
What APEXlang does not magically solve
It would be misleading to suggest that APEXlang removes all complexity.
You still need to understand:
- relational data modeling;
- APEX session state;
- form processing;
- Interactive Report behavior;
- page branches;
- conditions;
- Universal Theme;
- security;
- authorization;
- deployment environments;
- and runtime testing.
APEXlang gives you a new interface to the APEX metadata model.
It does not eliminate that model.
The better your APEX knowledge, the more effectively you can use APEXlang and AI coding tools together.
My learning
This experiment changed how I think about low-code development.
1. Low-code and source control are no longer separate worlds
A text-based application representation makes Git workflows much more natural.
2. AI can work on more than isolated code snippets
It can help define complete application pages, navigation, forms, reports, and styling.
3. The compiler provides a strong correction loop
Generated output can be validated against the real target environment rather than accepted on trust.
4. Visual development remains available
Developers can move between APEXlang, Page Designer, SQL, and runtime testing depending on what is most efficient.
5. Enterprise applications become a realistic target for vibe coding
Not because governance, testing, and architecture disappear, but because the initial implementation and iteration speed increase dramatically.
My next steps
The current application already supports customers and discovery sessions.
The next modules will include:
- AI use cases;
- connected systems;
- value and feasibility scoring;
- data-readiness assessment;
- risk evaluation;
- solution recommendations;
- and implementation actions.
A future workflow could allow a user to describe the desired application in natural language:
Create a customer discovery application with customers, workshops, candidate AI use cases, scoring, systems, and recommended Oracle services.
The AI assistant could then:
- inspect the database model;
- generate the APEXlang structure;
- validate it;
- correct compiler errors;
- import the application;
- and leave the final business and visual approval to the developer.
That is the direction I find most exciting.
Bonus: Quick-start checklist
Environment
- Install a compatible Java version
- Download and configure SQLcl
- Create or access an Autonomous Database
- Enable or access Oracle APEX 26.1
- Create an APEX workspace
- Associate the parsing schema
- Install Visual Studio Code
- Install Oracle SQL Developer for VS Code
- Initialize a Git repository
Database
- Create the application tables
- Add constraints and relationships
- Load seed data
- Verify table metadata and row counts
SQLcl
- Configure
TNS_ADMIN - Create a stored connection
- Save the password securely for non-interactive use
- Test the connection from the shell
APEXlang
- Export or generate the application in split APEXlang format
- Fix the target Application ID
- Define pages and shared components
- Validate with SQLcl
- Fix compiler errors
- Import only after successful validation
Runtime
- Test report data
- Test create
- Test update
- Test delete
- Verify branches and cache clearing
- Review desktop and responsive layouts
- Export the confirmed application state
- Commit the final changes
This was only my first hands-on experiment with APEXlang, and there is still a lot more to explore. I will continue sharing what I learn as I extend the application with new modules, automation patterns, AI-assisted workflows, and more advanced Oracle APEX capabilities.
You can follow me on LinkedIn for upcoming articles, demos, and practical Oracle AI and data content, or visit my website to find more of my projects and technical guides.
And until the next experiment… Happy coding — or should I say, happy vibe coding! 😄