
Introduction
In Oracle APEX, interactive grids are essential for displaying and manipulating data in a dynamic and user-friendly manner. Recently, I developed a module for making quotations to customers, where the challenge was to modify an interactive grid using JavaScript. In this article, I’ll walk you through the steps to achieve this, showing how to add products to a quotation by clicking a link and populating the customer information accordingly.
Context and Setup
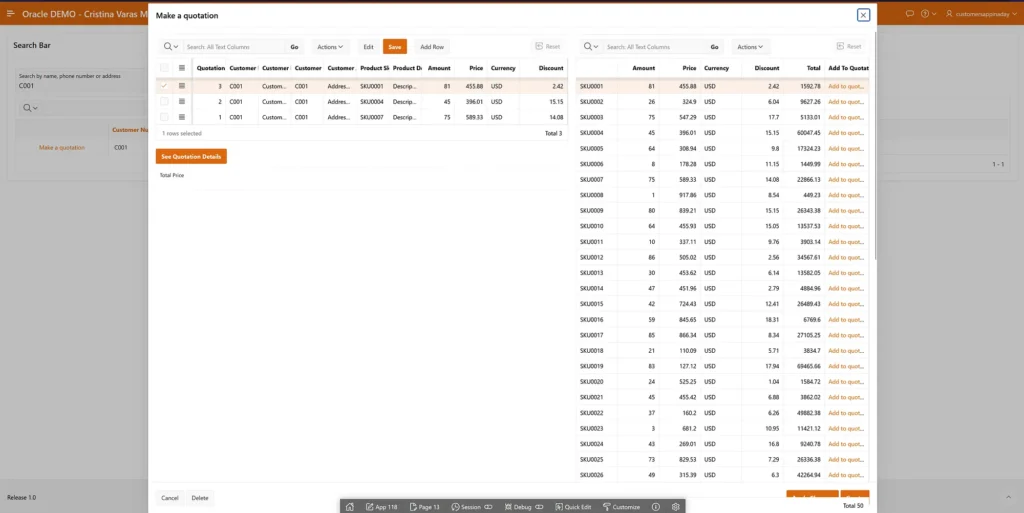
The goal is to create an interactive grid where you can click a link to add a product to a quotation. The first screen displays available products, and clicking “Add to Quotation” adds the product to the quotation while populating the customer information.
Here’s a breakdown of the process:
- First Screen — Make a quotation: Displays available products.
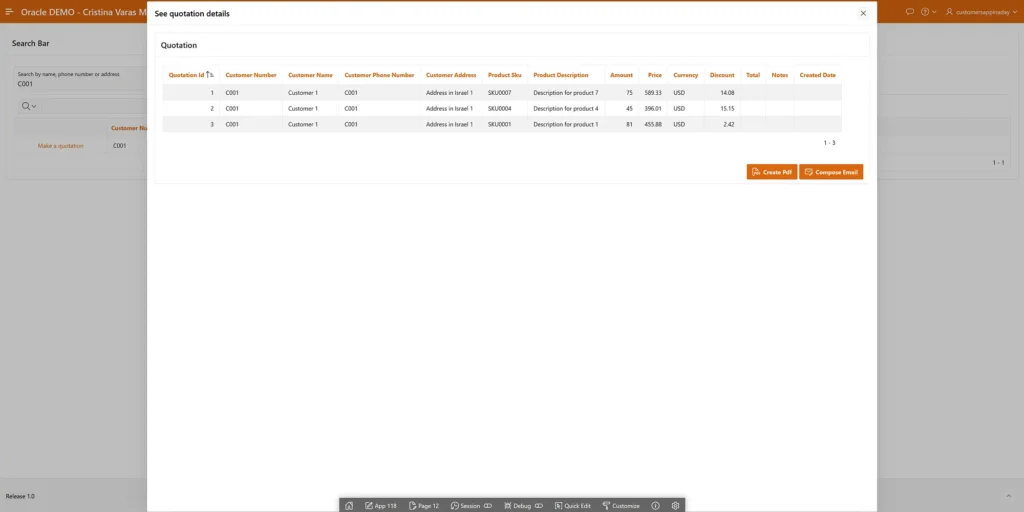
- Second Screen — See quotation details: Prepares the quotation with selected products and customer information.
Step-by-Step Guide
Step 1: Setting Up the Interactive Grid
1. Navigate to the Page Designer:
- Open the Oracle APEX application and navigate to the Page Designer.
- Locate the page that will contain the quotation interactive grid.
2. Add and configure the Interactive Grids:
- Add an Interactive Grid region and add an static id like
quotations_ig. - Add another Interactive Grid region and add the static id
available_products_region_static_id.
*Static ID is important for coding the component modifications with JavaScript.
Step 2: Adding JavaScript to Handle Interactions
In the Page Designer, add the following JavaScript code to handle the addition of products to the quotation and update the total price.
var productSku;

function addToQuotation(productSku) {
    try {
        var quotations_ig = apex.region("quotations_ig").widget().interactiveGrid("getViews", "grid").model;
        var products_ig = apex.region("available_products_region_static_id").widget().interactiveGrid("getViews", "grid").model;

        if (!quotations_ig) {
            throw new Error("Interactive Grid model is not available.");
        }

        var newId = quotations_ig.insertNewRecord(null);
        var rec = quotations_ig.getRecord(newId);
        var product_rec = products_ig.getSelectedRecords();

        quotations_ig.setValue(rec, "PRODUCT_SKU", products_ig.getValue(product_rec[0], "SKU"));
        quotations_ig.setValue(rec, "PRODUCT_DESCRIPTION", products_ig.getValue(product_rec[0], "DESCRIPTION"));
        quotations_ig.setValue(rec, "AMOUNT", products_ig.getValue(product_rec[0], "AMOUNT"));
        quotations_ig.setValue(rec, "PRICE", products_ig.getValue(product_rec[0], "PRICE"));
        quotations_ig.setValue(rec, "CURRENCY", products_ig.getValue(product_rec[0], "CURRENCY"));
        quotations_ig.setValue(rec, "DISCOUNT", products_ig.getValue(product_rec[0], "DISCOUNT"));

        quotations_ig.setValue(rec, "CUSTOMER_NUMBER", $v("P13_CUSTOMER_NUMBER"));
        quotations_ig.setValue(rec, "CUSTOMER_NAME", $v("P13_CUSTOMER_NAME"));
        quotations_ig.setValue(rec, "CUSTOMER_PHONE_NUMBER", $v("P13_CUSTOMER_PHONE_NUMBER"));
        quotations_ig.setValue(rec, "CUSTOMER_ADDRESS", $v("P13_CUSTOMER_ADDRESS"));

    } catch (e) {
        console.error("Error adding product to quotation: ", e);
    }
}
Detailed Explanation of the Code
Variable Declaration
var productSku;
productSku: This global variable is declared to hold the SKU of the product that will be added to the quotation.
Function Declaration: addToQuotation
function addToQuotation(productSku) {
    try {
        var quotations_ig = apex.region("quotations_ig").widget().interactiveGrid("getViews", "grid").model;
        var products_ig = apex.region("available_products_region_static_id").widget().interactiveGrid("getViews", "grid").model;

        if (!quotations_ig) {
            throw new Error("Interactive Grid model is not available.");
        }
- addToQuotation(productSku): This function is triggered when a product is added to the quotation.
- try: The
tryblock is used to handle potential errors gracefully. - quotations_ig: Retrieves the interactive grid model for the quotations grid.
- products_ig: Retrieves the interactive grid model for the available products grid.
- Error Handling: Checks if the
quotations_igmodel is available; if not, it throws an error.
Inserting a New Record
var newId = quotations_ig.insertNewRecord(null);
var rec = quotations_ig.getRecord(newId);
var product_rec = products_ig.getSelectedRecords();
- newId: Inserts a new record into the quotations grid and returns the new record’s ID.
- rec: Retrieves the newly created record using its ID.
- product_rec: Gets the selected records from the available products grid.
Setting Values for the New Record
quotations_ig.setValue(rec, "PRODUCT_SKU", products_ig.getValue(product_rec[0], "SKU"));
quotations_ig.setValue(rec, "PRODUCT_DESCRIPTION", products_ig.getValue(product_rec[0], "DESCRIPTION"));
quotations_ig.setValue(rec, "AMOUNT", products_ig.getValue(product_rec[0], "AMOUNT"));
quotations_ig.setValue(rec, "PRICE", products_ig.getValue(product_rec[0], "PRICE"));
quotations_ig.setValue(rec, "CURRENCY", products_ig.getValue(product_rec[0], "CURRENCY"));
quotations_ig.setValue(rec, "DISCOUNT", products_ig.getValue(product_rec[0], "DISCOUNT"));

quotations_ig.setValue(rec, "CUSTOMER_NUMBER", $v("P13_CUSTOMER_NUMBER"));
quotations_ig.setValue(rec, "CUSTOMER_NAME", $v("P13_CUSTOMER_NAME"));
quotations_ig.setValue(rec, "CUSTOMER_PHONE_NUMBER", $v("P13_CUSTOMER_PHONE_NUMBER"));
quotations_ig.setValue(rec, "CUSTOMER_ADDRESS", $v("P13_CUSTOMER_ADDRESS"));
setValue: Sets various fields in the new quotation record using values from the selected product record and customer details from the page items.
- Product Details: Sets
PRODUCT_SKU,PRODUCT_DESCRIPTION,AMOUNT,PRICE,CURRENCY, andDISCOUNTusing values from the selected product. - Customer Details: Sets
CUSTOMER_NUMBER,CUSTOMER_NAME,CUSTOMER_PHONE_NUMBER, andCUSTOMER_ADDRESSusing values from the page items (P13_CUSTOMER_NUMBER,P13_CUSTOMER_NAME,P13_CUSTOMER_PHONE_NUMBER, andP13_CUSTOMER_ADDRESS).
Error Handling
} catch (e) {
        console.error("Error adding product to quotation: ", e);
    }
}
catch (e): Catches any errors that occur during the execution of the try block and logs them to the console.
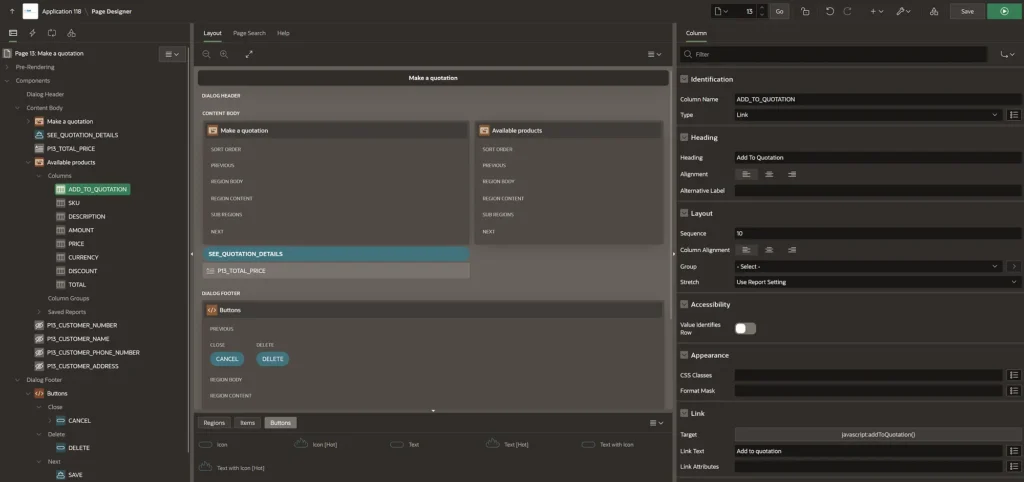
Step 3: Linking the JavaScript Function to the “Add to Quotation” Link
- Configure the Link:
- In the
available_products_region_static_idinteractive grid, add a column for the “Add to Quotation” link. - Set the link’s target to execute the
addToQuotationJavaScript function, passing theproductSku.

Step 4: Setting Up the Save Interactive Grid Data Process
In the Page Designer, configure the process for saving the interactive grid data.
1.Add a New Process:
- Click on the “Add” button (plus icon) in the “Processing” section.
- Choose “Create” and then select “Process” from the dropdown menu.
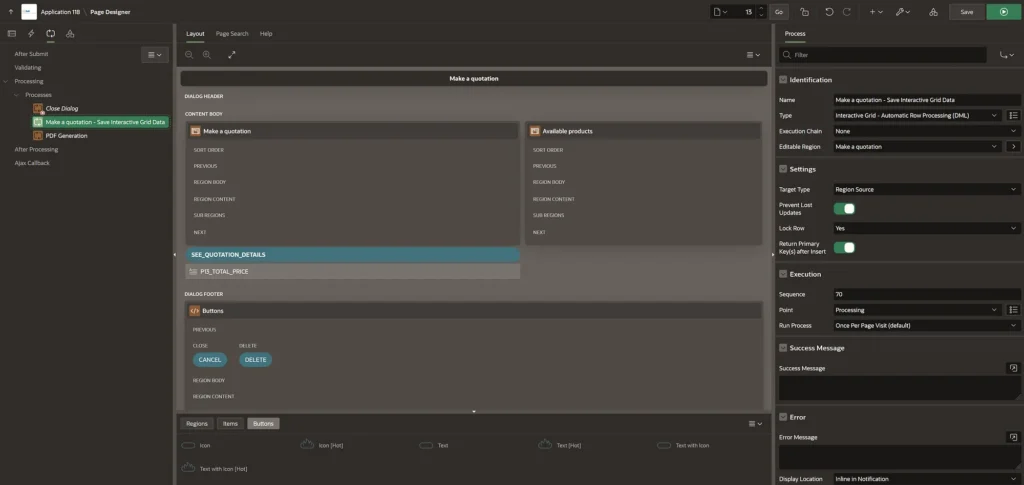
2. Configure the Process:
- Name: Enter a name for the process. In your case, it is “Make a quotation — Save Interactive Grid Data”.
- Type: Select “Interactive Grid — Automatic Row Processing (DML)”. This type is used for automatically handling DML operations (insert, update, delete) on the rows of an interactive grid.
3. Editable Region:
- In the properties panel on the right, find the “Editable Region” setting.
- Select the interactive grid region that you want this process to work on. For instance, you should select the “Make a quotation” region.
4. Settings:
- Target Type: Set this to “Region Source”. This specifies that the data source for the interactive grid is a region.
- Prevent Lost Updates: Enable this option to prevent data loss due to concurrent updates.
- Lock Row: Enable this option to lock the row being processed.
- Return Primary Key(s) after Insert: Enable this option to get the primary key values of the newly inserted rows.
5. Execution:
- Sequence: Set the sequence order in which this process should run relative to other processes. The default is typically fine.
- Point: Select “Processing”. This determines when the process should execute.
- Run Process: Set this to “Once Per Page Visit (default)”.
6. Success Message:
- Optionally, you can enter a message to be displayed when the process completes successfully. For example, “Quotation saved successfully!”.
7. Error Message:
- Optionally, you can enter an error message to be displayed if the process fails. For example, “Error saving the quotation.”.
- Display Location: Choose “Inline in Notification” to show the message within the notification area of the page.
Step 5: Testing and Validating
- Run the application and navigate to the first screen with available products.
- Click on “Make a Quotation” to navigate to the second screen.
- Click “Add to Quotation” for a product and ensure the product is added to the quotation with customer information populated.
Conclusion
By following these steps, you can effectively modify your interactive grid using JavaScript in Oracle APEX. This customization allows you to add products to a quotation while automatically populating customer information, enhancing the overall user experience. With this guide, you should be able to overcome similar challenges and create a more dynamic and functional application.
Additional Resources
Happy coding! 🙂
For any questions contact me on LinkedIn!
trtert