Integrating Oracle APEX with Oracle Object Storage is a fundamental step toward creating robust applications for managing data workflows and preparing for advanced data science services. In this article, I will outline the configuration steps and necessary code to visualize and upload files to Object Storage buckets directly from an APEX application. This setup lays the groundwork for integrating data science functionalities such as training and testing models within APEX. Let’s dive into the details! (I promise it’s easier than it seems).

Step 1: Creating a DBMS Credential
DBMS credentials are necessary to securely connect your database schema to Oracle Cloud Infrastructure (OCI). This credential allows the database to authenticate itself when interacting with OCI services such as Object Storage. Without this credential, operations like listing or uploading objects to the bucket would not be permitted due to insufficient authentication. The credential acts as a bridge between the database and OCI, using your OCI username and an authentication token to establish trust.
To interact with Oracle Object Storage, we need to create a database credential using the DBMS_CLOUD.CREATE_CREDENTIAL procedure. This credential links the database schema used in APEX to your Oracle Cloud Infrastructure (OCI) account.
Here are the steps to create the credential:
- Obtain the Auth Token:
- Navigate to your OCI console.
- Go to your user profile and click on “Auth Tokens.”
- Generate a new Auth Token and save it. This token will act as the password for the credential.
2. Execute the SQL Script:
- Use SQL Developer or the SQL Workshop in APEX to run the following script:
BEGIN
 DBMS_CLOUD.CREATE_CREDENTIAL(
 credential_name => 'DBMS_CRIS_CREDENTIAL',
 username => 'oracleidentitycloudservice/your_email@domain.com',
 password => 'your_auth_token'
 );
END;
/
Replace your_email@domain.com with your OCI username and your_auth_token with the token you generated.
Step 2: Creating a Web Credential in APEX
To simplify interactions with OCI services, you can create a Web Credential in APEX for secure and reusable authentication.
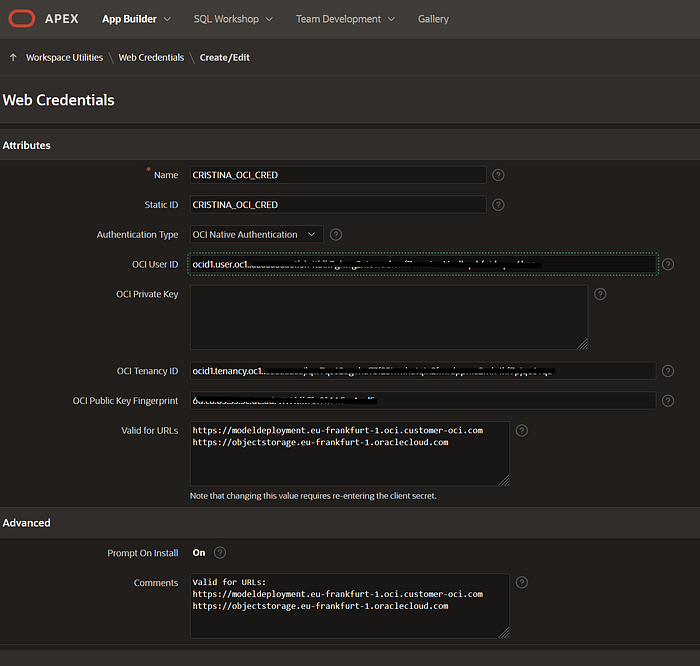
- Navigate to Web Credentials:
Go to “Workspace Utilities > Web Credentials.”
2. Create a New Credential:
Name: YOUR_OCI_CRED.
Authentication Type: OCI Native Authentication.
Fill in the required fields:
- OCI User ID
- OCI Private Key (paste your private key)
- OCI Tenancy ID
- OCI Public Key Fingerprint
Specify valid URLs for access, such as: https://objectstorage.eu-frankfurt-1.oraclecloud.com
Step 3: Defining Substitution Strings
To streamline your code and reuse values across the application, define substitution strings for key values.
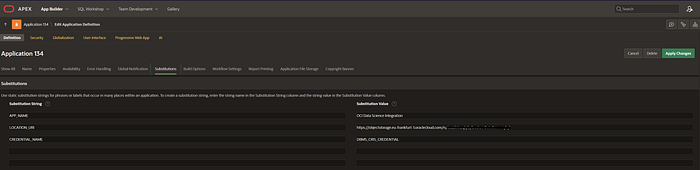
- Navigate to Substitutions:
Go to “App Builder > Edit Application Definition > Substitutions.”
- Add Entries:
APP_NAME: “OCI Data Science Integration”LOCATION_URI: The base URI of your bucket (e.g.,https://objectstorage.eu-frankfurt-1.oraclecloud.com/n/namespace/b/bucket_name/o/)CREDENTIAL_NAME: “DBMS_CRIS_CREDENTIAL“
These substitutions simplify code maintenance and ensure consistency.
Step 4: Visualizing Bucket Contents
You can use an Interactive Report in APEX to list the contents of your Object Storage bucket. The DBMS_CLOUD.LIST_OBJECTS procedure fetches this data.
1. Add a Region:
Type: Interactive Report
2. Define the Query:
SELECT object_name,
 bytes,
 checksum,
 last_modified,
 'Download' as download_object
FROM DBMS_CLOUD.LIST_OBJECTS(:CREDENTIAL_NAME, :LOCATION_URI || 'input/');
This query lists the objects in the input directory of your bucket.
Step 5: Uploading Files to the Bucket
To upload files, create a process in APEX that executes the following PL/SQL code. This process is associated with a button and is triggered when the button’s “Submit” action is performed.
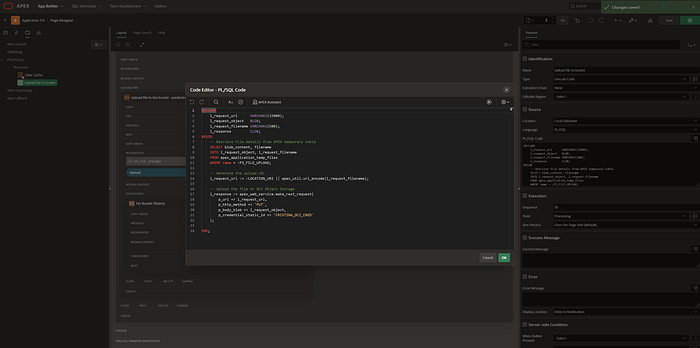
DECLARE
    l_request_url   VARCHAR2(32000);
    l_request_object BLOB;
    l_request_filename VARCHAR2(500);
    l_response       CLOB;
BEGIN
    -- Retrieve file details from APEX temporary table
    SELECT blob_content, filename
    INTO   l_request_object, l_request_filename
    FROM   apex_application_temp_files
    WHERE  name = :P3_FILE_UPLOAD;

    -- Generate the upload URL
    l_request_url := :LOCATION_URI || apex_util.url_encode(l_request_filename);

    -- Upload the file to OCI Object Storage
    l_response := apex_web_service.make_rest_request(
        p_url           => l_request_url,
        p_http_method   => 'PUT',
        p_body_blob     => l_request_object,
        p_credential_static_id => 'CRISTINA_OCI_CRED'
    );
END;
Explanation of the Code:
- Retrieve File Details: The
apex_application_temp_filestable holds details of files uploaded through APEX file upload items. This query fetches the binary content and filename of the uploaded file. - Generate Upload URL: The upload URL is constructed by appending the encoded filename to the
LOCATION_URIsubstitution string. - Upload File: The
apex_web_service.make_rest_requestprocedure performs thePUTrequest to upload the file to Object Storage using theCRISTINA_OCI_CREDWeb Credential.
This process ensures that files uploaded via the APEX interface are securely transferred to the specified Object Storage bucket.
Wrapping Up
In this tutorial, we configured Oracle APEX to interact with Oracle Object Storage. By creating DBMS credentials, defining substitution strings, and implementing PL/SQL processes, we enabled file uploads and visualizations. This application serves as the foundation for integrating data science workflows into APEX — stay tuned for the next steps, where we’ll connect to OCI Data Science for model training and predictions.
Big KUDOS to my colleague Paolo Paolucci, who made this possible with his extensive DBA experience.
You can always follow or contact me on my LinkedIn for more insights and updates.
Happy coding! 🙂