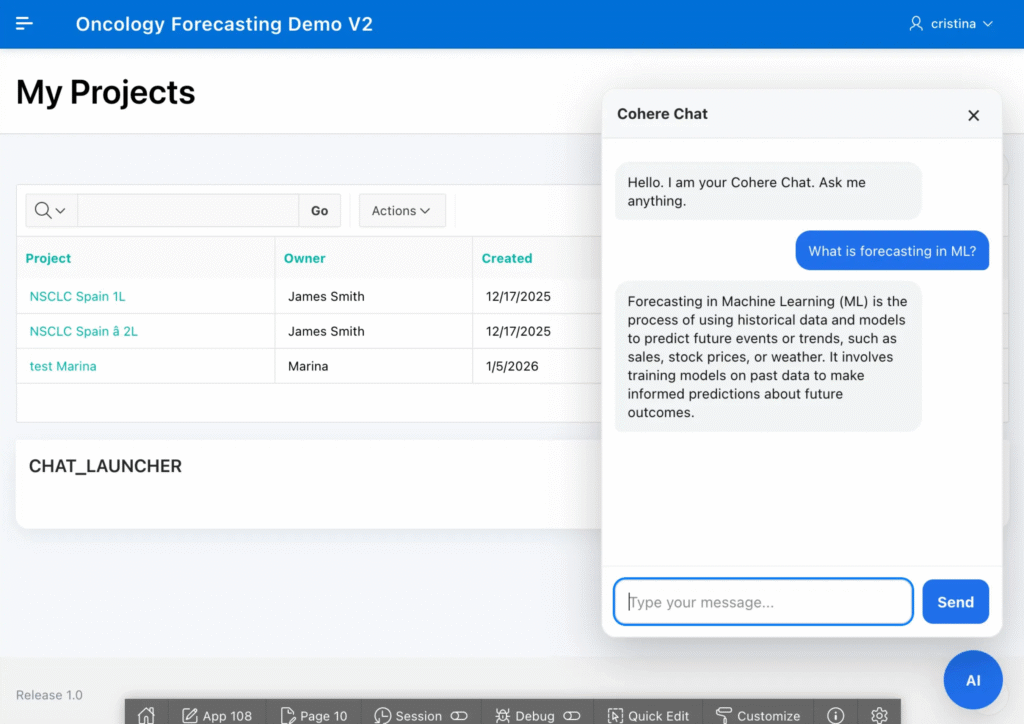
In the past weeks I’ve been working on an Oncology Forecasting prototype built with Oracle APEX + Autonomous Database (ADB). The goal is straightforward (but very powerful): let business users define a scenario (country, indication, time horizon, epidemiology assumptions, products…), run the forecast, and then explore the results.
The real challenge is not only computing numbers. It’s making the experience easy and intuitive. This is where Generative AI adds immediate value: an in-app conversational co-pilot that can guide the user, answer questions, and eventually help interpret outputs.
That said, in this article we’ll start with the most reusable building block: a floating chatbot in Oracle APEX, connected to an OCI Generative AI model (for example, Cohere), so the user can chat about anything.
In upcoming articles, we’ll build on top of this foundation: guided chat “wizards” powered by PL/SQL, validations, process execution, and results interpretation. Fully leveraging the data already stored in ADB.
What we’re building
Today we implement only:
- A floating “AI” button (bottom-right)
- A chat modal (open/close)
- Chat-style messages (user / assistant)
- An AJAX Callback in APEX
- PL/SQL that calls
DBMS_CLOUD_AI.GENERATEusing a profile - A JSON response that the UI uses to render the assistant message

Important: we will not include forecasting logic or scenario context in this article. Ikeep it intentionally simple so you can replicate it in any APEX application.
Why OCI Generative AI?
OCI Generative AI lets you consume LLMs (Cohere, Llama, etc.) as a managed service. In enterprise scenarios this is especially attractive because:
- You can use already deployed/managed models in OCI
- Authentication and access control are handled via IAM
- You avoid exposing API keys in the frontend
- It is a natural architecture when your app and data already live in OCI/ADB
With this approach, the key point is: the LLM call happens from the database, not from the browser.
Prerequisites
You will need:
- Oracle APEX running on Autonomous Database (or another DB where
DBMS_CLOUD_AIis available/configured). - Access to OCI Generative AI (or OCI AI providers supported by your
DBMS_CLOUD_AIsetup). - Permissions to create:
- A DBMS_CLOUD_AI profile
- A small PL/SQL package (optional but recommended)
- An APEX page with an AJAX callback
Step 1 — Create the Generative AI profile in ADB
A DBMS_CLOUD_AI profile defines how the database connects to your GenAI provider/model.
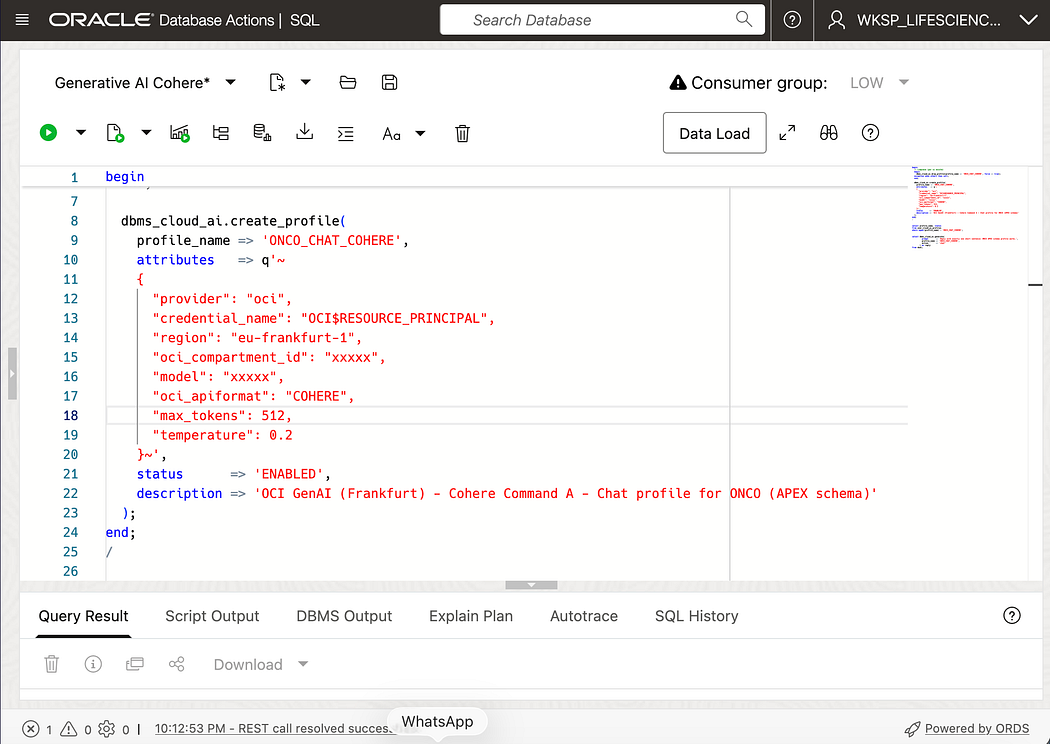
Example (adjust to your environment/provider settings):
BEGIN
  DBMS_CLOUD_AI.CREATE_PROFILE(
    profile_name => 'COHERE_CHAT_PROFILE',
    attributes   => '{
      "provider": "cohere",
      "model": "command-r-plus",
      "temperature": 0.3,
      "max_tokens": 600
    }'
  );
END;
/
Notes:
- Use the provider/model that your environment supports.
- If your org uses a different profile approach (Vault credentials, endpoint attributes, etc.), keep the concept the same: the page will call
DBMS_CLOUD_AI.GENERATEreferencing this profile by name.
Step 2 — Create a simple PL/SQL package for chat
This package will:
- Receive the user text
- Call the LLM
- Return a JSON string back to APEX
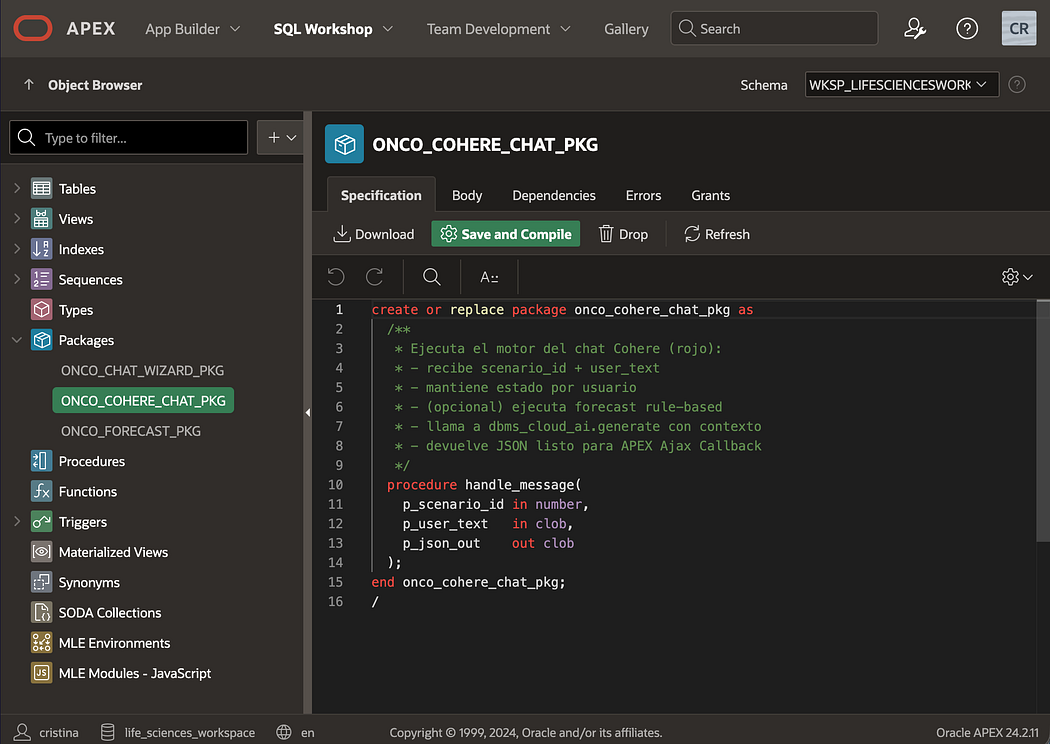
Package Spec
CREATE OR REPLACE PACKAGE ONCO_SIMPLE_CHAT_PKG AS
  PROCEDURE CHAT(
    p_user_text IN CLOB,
    p_json_out  OUT CLOB
  );
END ONCO_SIMPLE_CHAT_PKG;
/
Package Body
CREATE OR REPLACE PACKAGE BODY ONCO_SIMPLE_CHAT_PKG AS

  PROCEDURE CHAT(
    p_user_text IN CLOB,
    p_json_out  OUT CLOB
  ) IS
    l_prompt   CLOB;
    l_reply    CLOB;
  BEGIN
    -- Basic system prompt (keep it generic for this article)
    l_prompt :=
         'You are a helpful assistant inside an Oracle APEX application.' || chr(10) ||
         'Answer clearly and concisely.' || chr(10) || chr(10) ||
         'USER:' || chr(10) ||
         p_user_text;

    l_reply := DBMS_CLOUD_AI.GENERATE(
                 prompt       => l_prompt,
                 profile_name => 'COHERE_CHAT_PROFILE',
                 action       => 'chat'
               );

    apex_json.initialize_clob_output;
    apex_json.open_object;
    apex_json.write('ok', true);
    apex_json.write('reply', l_reply);
    apex_json.close_object;

    p_json_out := apex_json.get_clob_output;
    apex_json.free_output;

  EXCEPTION
    WHEN OTHERS THEN
      apex_json.initialize_clob_output;
      apex_json.open_object;
      apex_json.write('ok', false);
      apex_json.write('error', SQLERRM);
      apex_json.close_object;

      p_json_out := apex_json.get_clob_output;
      apex_json.free_output;
  END CHAT;

END ONCO_SIMPLE_CHAT_PKG;
/
Step 3 — Create a page in APEX
In APEX:
- Create Page 10 → Blank Page
- Add a region (Static Content) called: AI Chat Launcher
- In that region, place:
- A floating button
- The modal markup
- A chat message container
- An input + send button
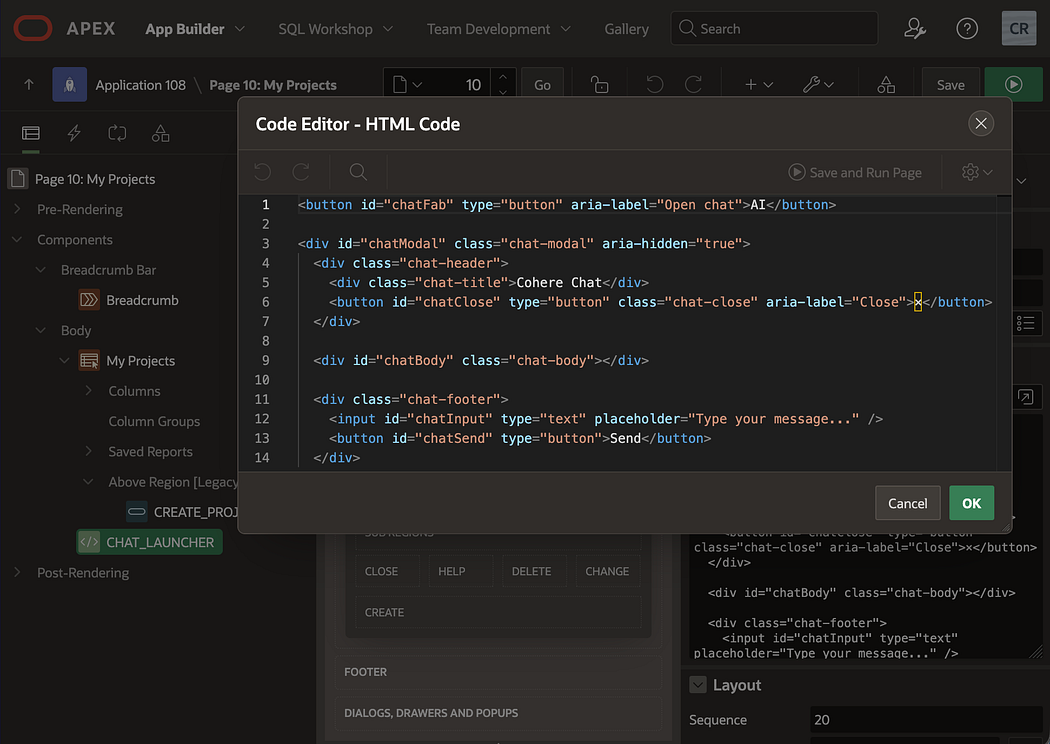
Step 4 — Add the Floating Button + Modal (HTML)
Create a region (Static Content) and paste:
<div id="ai-float-btn" title="Chat with AI">AI</div>

<div id="ai-chat-modal" class="ai-hidden">
  <div class="ai-chat-card">
    <div class="ai-chat-header">
      <div class="ai-chat-title">AI Assistant</div>
      <button id="ai-chat-close" type="button">✕</button>
    </div>

    <div id="ai-chat-messages" class="ai-chat-messages"></div>

    <div class="ai-chat-footer">
      <input id="ai-chat-input" type="text" placeholder="Type your message..." />
      <button id="ai-chat-send" type="button">Send</button>
    </div>
  </div>
</div>
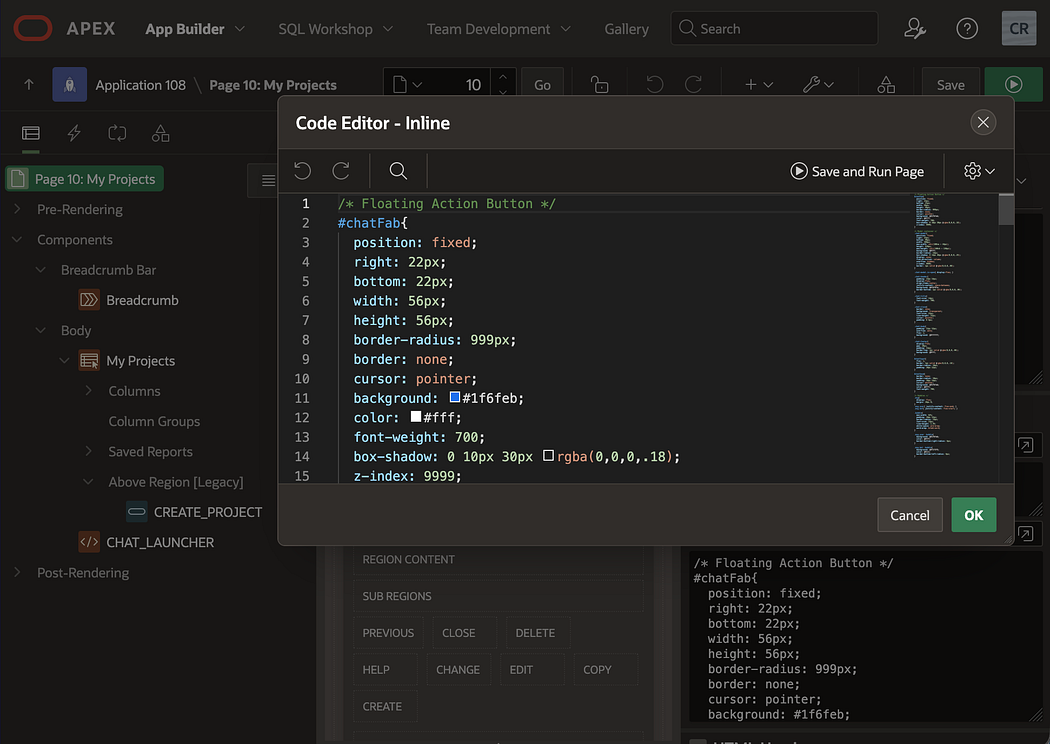
Step 5 — Add CSS (make it floating + clean)
Add this CSS in Page → CSS → Inline:
#ai-float-btn{
  position: fixed;
  right: 24px;
  bottom: 24px;
  width: 56px;
  height: 56px;
  border-radius: 999px;
  display:flex;
  align-items:center;
  justify-content:center;
  font-weight: 700;
  cursor: pointer;
  z-index: 9999;
  background: #1f6feb;
  color: #fff;
  box-shadow: 0 8px 24px rgba(0,0,0,.25);
}

#ai-chat-modal{
  position: fixed;
  inset: 0;
  background: rgba(0,0,0,.35);
  z-index: 10000;
  display:flex;
  align-items:center;
  justify-content:center;
}

.ai-hidden{ display:none !important; }

.ai-chat-card{
  width: 520px;
  max-width: calc(100vw - 32px);
  height: 640px;
  max-height: calc(100vh - 32px);
  background: #fff;
  border-radius: 18px;
  overflow:hidden;
  display:flex;
  flex-direction:column;
  box-shadow: 0 16px 40px rgba(0,0,0,.30);
}

.ai-chat-header{
  padding: 14px 16px;
  display:flex;
  align-items:center;
  justify-content:space-between;
  border-bottom: 1px solid #eee;
}

.ai-chat-title{ font-weight: 700; }

.ai-chat-messages{
  padding: 14px 16px;
  overflow:auto;
  flex: 1;
  background: #fafafa;
}

.ai-msg{
  margin: 10px 0;
  padding: 10px 12px;
  border-radius: 14px;
  max-width: 85%;
  white-space: pre-wrap;
}

.ai-user{
  margin-left:auto;
  background:#1f6feb;
  color:#fff;
}

.ai-bot{
  margin-right:auto;
  background:#fff;
  border: 1px solid #e8e8e8;
  color:#111;
}

.ai-chat-footer{
  display:flex;
  gap: 10px;
  padding: 12px 12px;
  border-top: 1px solid #eee;
  background:#fff;
}

#ai-chat-input{
  flex:1;
  padding: 10px 12px;
  border: 1px solid #ddd;
  border-radius: 12px;
}

#ai-chat-send{
  padding: 10px 14px;
  border: none;
  border-radius: 12px;
  background:#1f6feb;
  color:#fff;
  font-weight: 700;
  cursor:pointer;
}
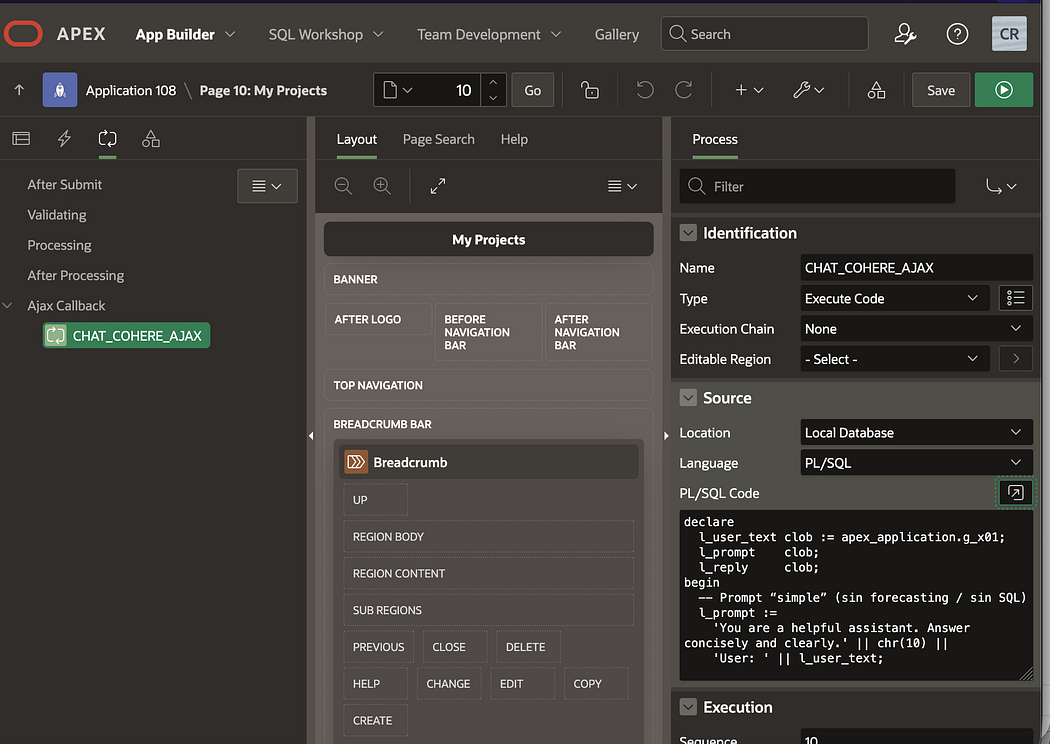
Step 6 — Create an AJAX Callback in Page 10
- Go to Page 10 → Processing
- Create AJAX Callback process:
- Name:
AI_CHAT
3. Paste this PL/SQL:
DECLARE
  l_text   CLOB := apex_application.g_x01;
  l_json   CLOB;
BEGIN
  ONCO_SIMPLE_CHAT_PKG.CHAT(
    p_user_text => l_text,
    p_json_out  => l_json
  );

  owa_util.mime_header('application/json', false);
  htp.p('Cache-Control: no-store');
  owa_util.http_header_close;

  htp.p(l_json);
END;
Step 7 — Add JavaScript (send messages + render replies)
Add this in Page → JavaScript → Function and Global Variable Declaration (or Inline if you prefer):
function aiAddMessage(text, who){
  const box = document.getElementById("ai-chat-messages");
  const div = document.createElement("div");
  div.className = "ai-msg " + (who === "user" ? "ai-user" : "ai-bot");
  div.textContent = text;
  box.appendChild(div);
  box.scrollTop = box.scrollHeight;
}

async function aiSend(){
  const input = document.getElementById("ai-chat-input");
  const text = (input.value || "").trim();
  if(!text) return;

  aiAddMessage(text, "user");
  input.value = "";

  apex.server.process(
    "AI_CHAT",
    { x01: text },
    {
      dataType: "json",
      success: function(pData){
        if(pData && pData.ok){
          aiAddMessage(pData.reply || "(empty reply)", "bot");
        } else {
          aiAddMessage("Server error: " + (pData.error || "Unknown error"), "bot");
        }
      },
      error: function(req, status, err){
        aiAddMessage("Request failed: " + err, "bot");
      }
    }
  );
}

function aiInit(){
  const btn   = document.getElementById("ai-float-btn");
  const modal = document.getElementById("ai-chat-modal");
  const close = document.getElementById("ai-chat-close");
  const send  = document.getElementById("ai-chat-send");
  const input = document.getElementById("ai-chat-input");

  btn.addEventListener("click", () => {
    modal.classList.remove("ai-hidden");
    if(document.getElementById("ai-chat-messages").children.length === 0){
      aiAddMessage("Hi! I’m your AI assistant. How can I help?", "bot");
    }
    setTimeout(() => input.focus(), 50);
  });

  close.addEventListener("click", () => modal.classList.add("ai-hidden"));

  send.addEventListener("click", aiSend);

  input.addEventListener("keydown", (e) => {
    if(e.key === "Enter"){
      e.preventDefault();
      aiSend();
    }
  });
}

document.addEventListener("DOMContentLoaded", aiInit);
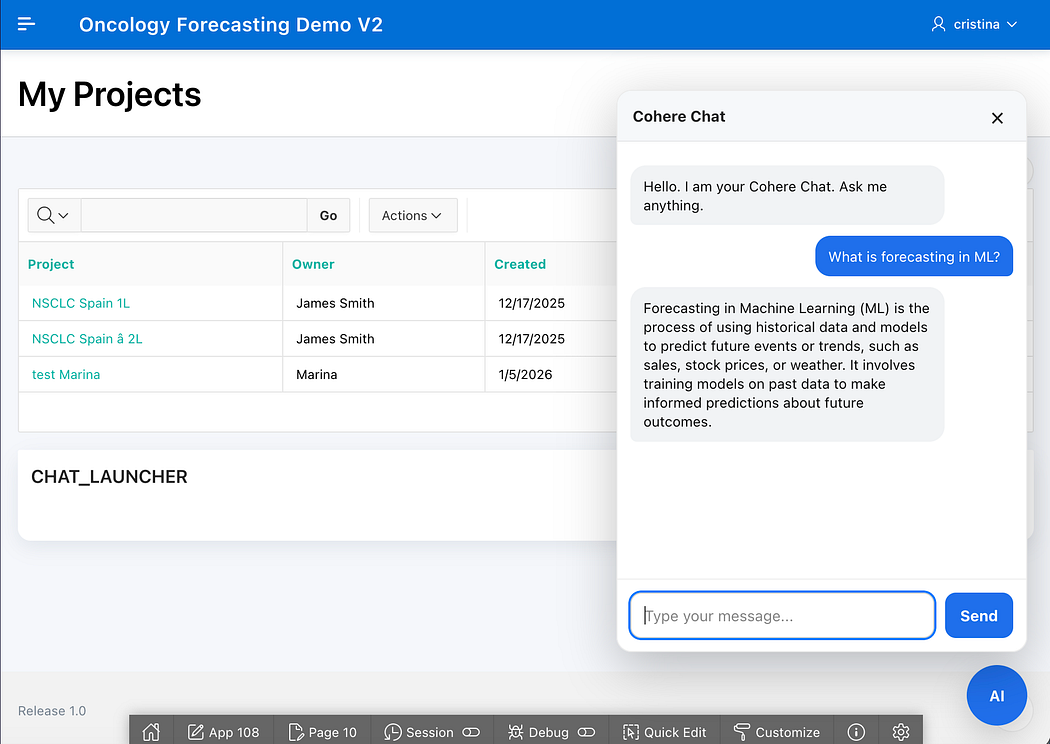
Step 8 — Test it
Run Page 10:
- Click the floating AI button
- Type a question (anything)
- Confirm:
- User bubble appears
- LLM reply appears
- No “Server error”
If you see an error:
- Check the profile name matches exactly (
COHERE_CHAT_PROFILE) - Confirm
DBMS_CLOUD_AI.GENERATEworks from SQL Workshop - Verify the AJAX Callback name is exactly
AI_CHAT
Where this goes next (guided chat + database intelligence)
This simple chatbot is the foundation. In the Oncology Forecasting project, the next step is to make it contextual and procedural, for example:
- The chat guides the user through scenario validation
- It can trigger PL/SQL procedures (run forecast, create scenario versions)
- It can read results tables and explain trends (market share, revenue, uptake)
- It becomes a wizard + analyst in one interface
That’s exactly what I’ll cover in the next articles: combining the chat UI with state management, guided flows, and data-driven reasoning. All inside ADB.
Want the full working demo or help implementing it?
If you’re building with Oracle APEX + OCI and want to implement this pattern (simple chatbot today, guided co-pilots tomorrow), feel free to reach out:
Happy coding! 🙂