Enhancing Data Analysis with Select AI in Oracle APEX
Introduction
In today’s data-driven world, extracting meaningful insights from vast amounts of data can be a daunting task. Oracle APEX, a powerful low-code application platform, now integrates with Select AI to simplify this process. This blog post will walk you through the steps to set up Select AI in Oracle APEX and demonstrate its capabilities in analyzing data using natural language. This guide is based on my experiences and notes from setting up and demonstrating these capabilities.
What is Select AI?
Select AI is a cutting-edge feature in Oracle APEX that leverages large language models (LLMs) to translate natural language queries into SQL queries. This allows users to interact with their data using everyday language, eliminating the need for deep technical knowledge of SQL or the database schema. By integrating Select AI with an Autonomous Database, users can ask questions, create summaries, and personalize their applications effortlessly.
Before you begin, ensure you have the following:
- Oracle Autonomous Database (ADB): An active Oracle ADB instance.
- Oracle APEX Workspace: Access to an Oracle APEX workspace.
- OpenAI Account: A paid OpenAI developer account with an API key.
- Database Privileges: Necessary privileges to execute DBMS_CLOUD_AI package in Oracle Database.
Steps to Set Up Select AI in Oracle APEX
1. Sign Up for Access to a Large Language Model (LLM)
A large language model (LLM) is an advanced artificial intelligence system designed to understand and generate human language by leveraging deep learning techniques and neural networks. These models, often built using transformer architectures, are trained on massive datasets comprising diverse text sources, enabling them to learn complex linguistic patterns and contextual nuances. With billions of parameters, LLMs excel at tasks such as text generation, completion, translation, summarization, and question answering. They are widely used in applications like virtual assistants, automated content creation, and customer service. However, despite their capabilities, LLMs face challenges, including limitations in understanding context fully and potential biases in their training data.
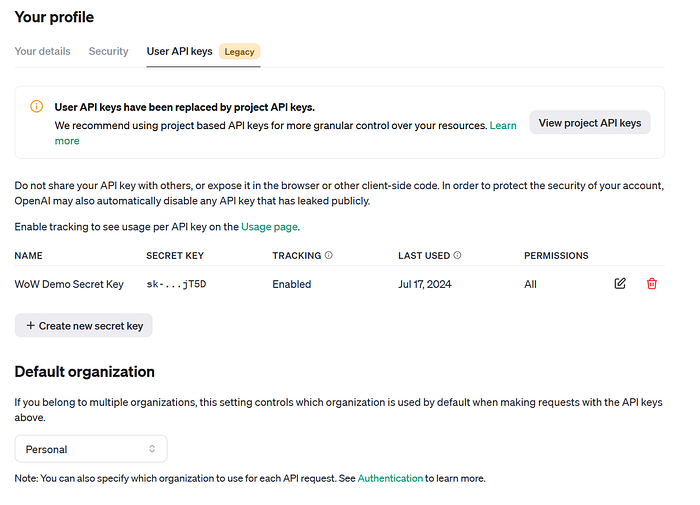
- Create an OpenAI account by visiting the OpenAI website.
- After signing up, navigate to the API key section to generate a secret key. This key will be used to authenticate API requests from Oracle APEX.
We use OpenAI for this setup due to its advanced capabilities in natural language processing and its robust API that integrates seamlessly with Oracle APEX. OpenAI’s models, such as GPT-4, are highly proficient in understanding and generating human-like text, making them ideal for translating natural language queries into SQL. Additionally, OpenAI provides comprehensive documentation and support, which facilitates a smoother integration process
While this guide focuses on using OpenAI, it’s worth noting that you can use other LLMs such as Cohere, Azure OpenAI, or OCI Generative AI. Each provider has its strengths, and you can choose the one that best fits your requirements and budget. The setup process will be similar, but you need to refer to the respective documentation for specific instructions.
2. Connect ADB to your LLM
2.1. Grant the Database User Permissions for Using Select AI:
To use Select AI, the database user needs specific privileges. Grant these privileges using the following SQL command. Note that this step is performed in the SQL service within your Autonomous Database (ADB).
GRANT EXECUTE ON DBMS_CLOUD_AI TO your_database_user;
Replace your_database_user with the actual username of the database user who will be using Select AI.
2.2. Open Access to the LLM’s REST Endpoint
To enable the database to communicate with the LLM, you need to configure the network access control list (ACL) to allow outbound HTTPS traffic to the LLM’s REST endpoint. This is done using the user of the schema that is used in Oracle APEX.
Sign into your Autonomous Database instance with administrator privileges.
Add your user to the ACL list and grant access to the DBMS_CLOUD_AI package.
Use the following PL/SQL block in the SQL service console of your ADB to append the necessary host and port information to the ACL:
BEGIN
  DBMS_NETWORK_ACL_ADMIN.APPEND_HOST_ACE (
    HOST         => 'api.openai.com',
    LOWER_PORT   => 443,
    UPPER_PORT   => 443,
    ACE          => xs$ace_type(
      PRIVILEGE_LIST => xs$name_list('http'),
      PRINCIPAL_NAME => 'your_database_user',
      PRINCIPAL_TYPE => xs_acl.ptype_db
    )
  );
END;
/
Replace your_database_user with the actual username.
2.3. Create a Database Credential to Your AI Provider Account
Use the uniquely generated token for API usage as the password.
BEGIN
   DBMS_CLOUD.CREATE_CREDENTIAL(
      credential_name => 'OPENAI_CRED_APEX',
      username => 'OPENAI_APEX',
      password => 'your_generated_token'
   );
END;
2.4. Create and Set Your DBMS_CLOUD_AI Profile
Specify the schema(s) and tables to be considered.
BEGIN
   DBMS_CLOUD_AI.create_profile(
      profile_name => 'OPENAI_APEX',
      attributes => '{"provider": "openai", "credential_name": "OPENAI_CRED_APEX", "object_list": [{"owner": "<WKPS_USER>", "name": "<TABLE_NAME>"}]}'
   );
END;
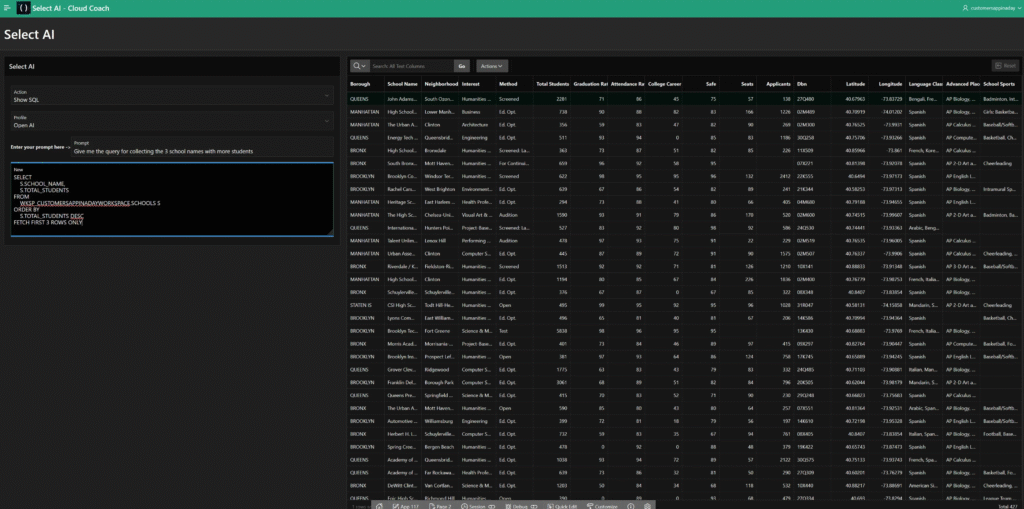
2.5. Invoke the First Select AI Prompt
SELECT DBMS_CLOUD_AI.GENERATE(
   prompt => 'GIVE ME 3 SCHOOL NAMES',
   profile_name => 'OPENAI_APEX',
   action => 'narrate'
) FROM DUAL;
3. Creating an APEX Application with Select AI
For this application, we will use a dataset containing information about high schools. This dataset includes various attributes such as school names, locations, student populations, and performance metrics. You can download it here: nyc_high_schools.csv
3.1. Set Up the Application
- Log in to your APEX workspace.
- Click on “App Builder” and then “Create” to start a new application.
- Choose “New Application” and provide the necessary details such as the application name and theme.
3.2. Add Pages and Items for Interacting with the AI
Add a Static Content Region
This region will display the static content and serve as the interface for user interactions.
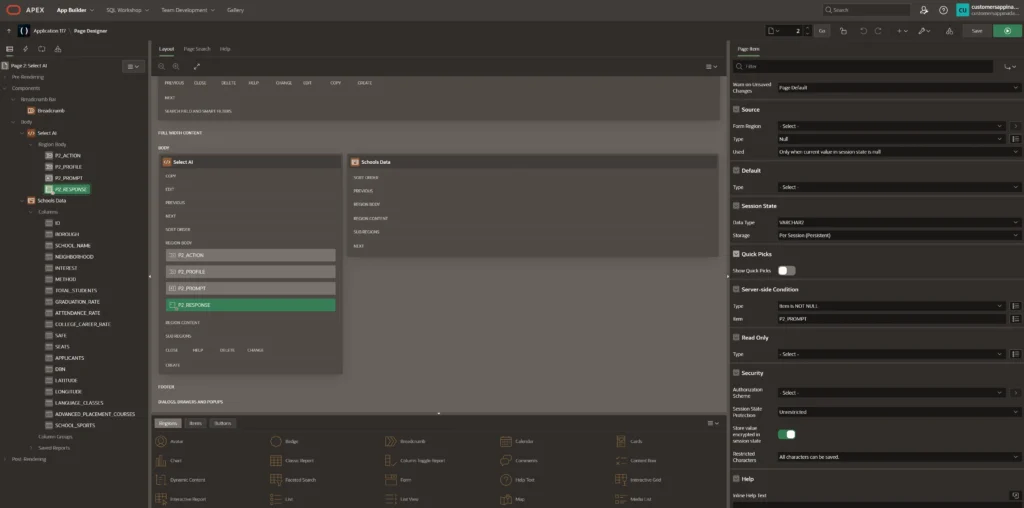
Create Input Fields:
P2_PROMPT: Text field for entering the natural language query.
P2_ACTION: Select list to choose the type of action (e.g., ‘narrate’, ‘summarize’).
P2_PROFILE: Select list to choose the AI profile created earlier.
P2_RESPONSE: Text area to display the AI’s response.
3.3. Configure the AI Profile and Process
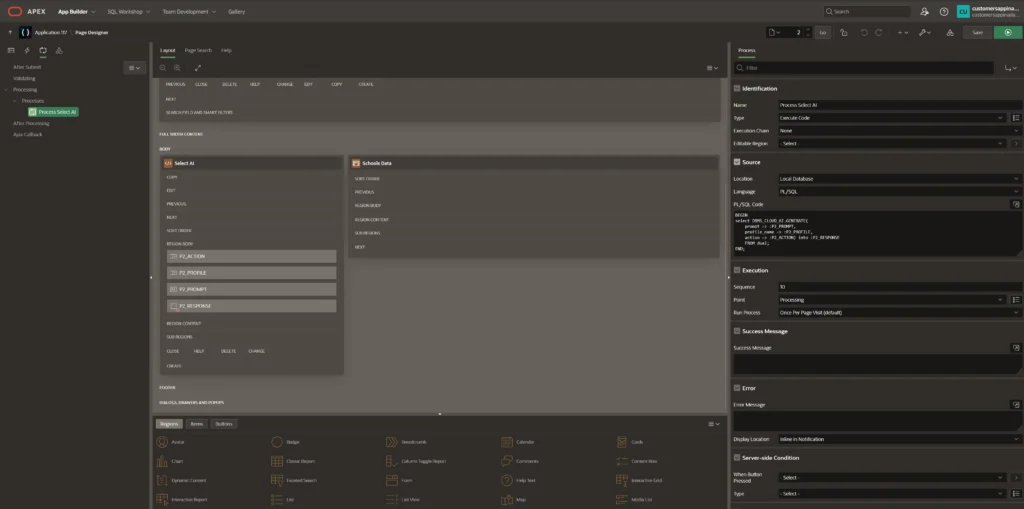
- Navigate to the “Processing” section of your APEX application.
- Click on “Create” and select “PL/SQL” as the type of process.
- Enter the following PL/SQL code to process the AI queries:
BEGIN
   SELECT DBMS_CLOUD_AI.GENERATE(
      prompt => :P2_PROMPT,
      profile_name => :P2_PROFILE,
      action => :P2_ACTION
   ) INTO :P2_RESPONSE
   FROM dual;
END;
This code takes the input from the P2_PROMPT field, uses the selected AI profile and action, and stores the response in the P2_RESPONSE field.
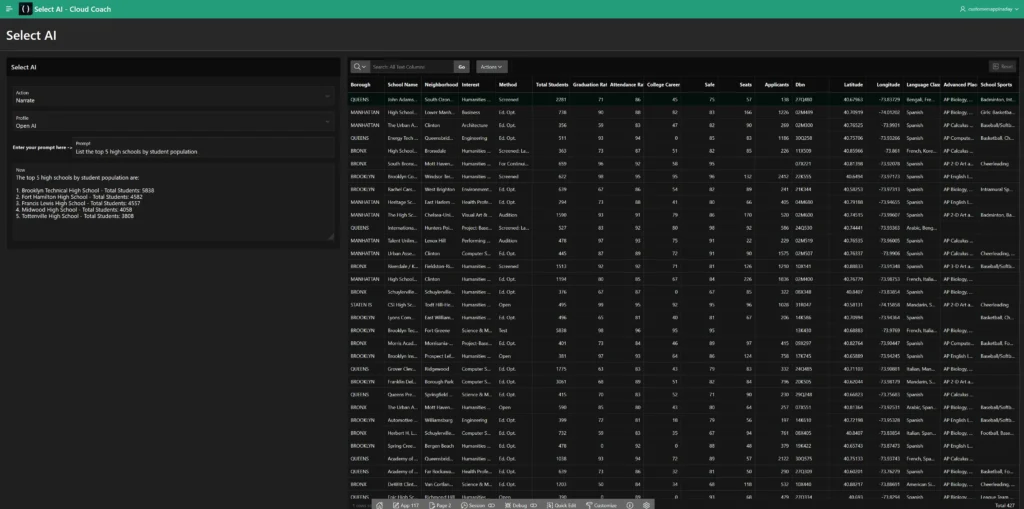
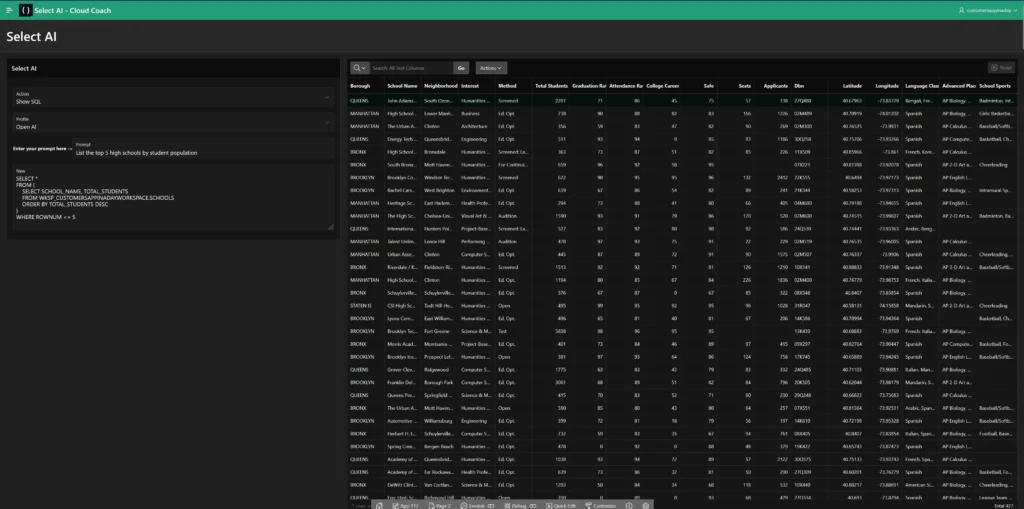
3.4. Run your Application and test it:
- Enter a natural language query in the P2_PROMPT field, such as “List the top 5 high schools by student population” or “What are the average test scores for high schools in New York?”.
- Select the appropriate action and profile, then click the “Submit Query” button.
- The AI’s response should appear in the P2_RESPONSE text area, providing the requested information based on the high schools dataset.

Conclusion
Integrating Select AI with Oracle APEX allows users to harness the power of AI for natural language data analysis. By following the steps outlined in this blog, you can set up and start using Select AI to transform how you interact with your data. The ability to ask questions in plain language and receive actionable insights can significantly enhance decision-making and efficiency in your organization.
Additional Resources
Happy coding! 🙂
For any questions contact me on LinkedIn!