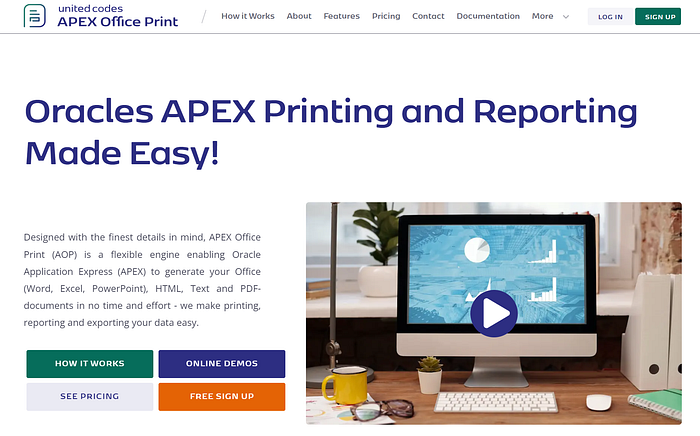
APEX is an incredibly versatile platform for building low-code applications, but one feature that really elevates its capabilities is the ability to generate professional-quality reports and documents. While APEX provides some built-in reporting tools, integrating it with APEX Office Print (AOP) takes things to a whole new level, especially for creating customizable Word, PDF, and Excel documents dynamically.
In this article, we’ll walk through the process of integrating APEX Office Print with Oracle APEX to generate reports based on Interactive Grids, Forms, or any other data-driven components in your application. We’ll cover everything from setting up an AOP account to installing the plugin, configuring templates, and generating a dynamic, printable report.
What is APEX Office Print?
APEX Office Print (AOP) is a powerful reporting tool that integrates with Oracle APEX, allowing you to generate highly customizable documents (Word, PDF, Excel, and more) directly from your applications. Whether you need to print invoices, contracts, reports, or any other type of document, AOP simplifies the process by connecting your APEX application to a flexible document-generation engine.
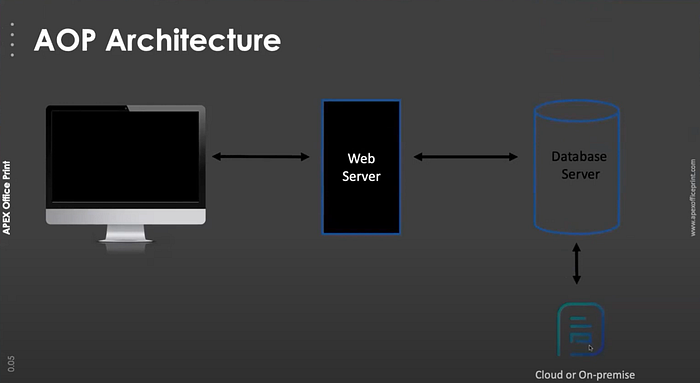
APEX Office Print (AOP) integrates with Oracle APEX to dynamically generate customizable documents such as Word, PDF, and Excel. It operates through a simple three-part architecture:
- Client (Your APEX Application): Users interact with the app and trigger report generation (e.g., by clicking a print button). The app gathers the required data from the database and sends it to the AOP web server.
- Web Server (AOP API Server): The AOP server receives the data, along with a predefined template, merges them, and generates the requested document. The template can be customized with placeholders that are replaced by actual data dynamically.
- Database Server (Oracle Database): The Oracle database supplies the data requested by the APEX app, which is then passed to the AOP server to generate the document.
Step-by-Step Guide to Setting Up AOP in Oracle APEX
Let’s dive into how you can use APEX Office Print to create reports and documents. Below is a detailed step-by-step process to get started:
Step 1: Create an APEX Office Print Account
Before you begin integrating AOP into Oracle APEX, the first step is to create an account on the APEX Office Print website. Once registered, you’ll be able to access your user dashboard. This is where you will find key information like your API Key, which is necessary for connecting AOP to your APEX environment.
Here’s what to do:
1. Go to APEX Office Print.
2. Register for an account and log in.
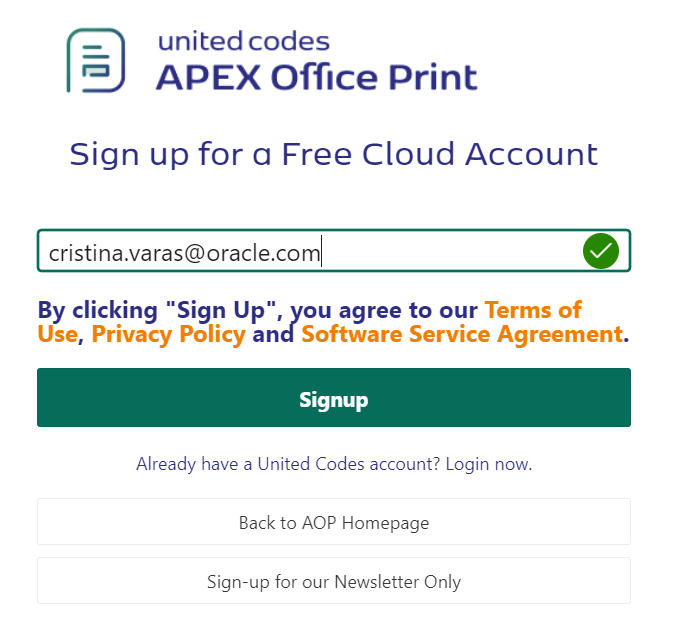
3. Navigate to the Dashboard section to locate your API Key. This key will be used later when you set up the plugin in APEX.
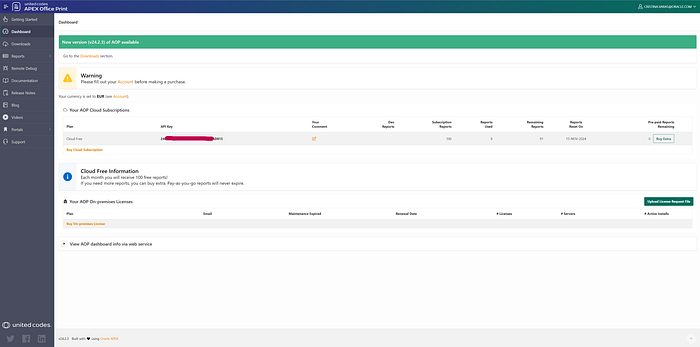
Pro Tip: The free version of AOP provides you with 100 reports per month. If you need more, you can easily upgrade your plan.
Step 2: Download the Latest Version of AOP
Once you’ve set up your account, you’ll need to download the latest version of APEX Office Print. The download package contains various files and folders that are essential for installing and configuring AOP within Oracle APEX.
Here’s a quick overview of the files in the AOP package:
- app: Contains demo applications.
- db: Contains database scripts.
- plugin: The folder that holds the files necessary to integrate AOP into your Oracle APEX environment.
- readme.txt: Documentation that explains how to use AOP in detail.

For our integration, we’ll focus on the plugin folder, specifically the SQL file named dynamic_action_plugin_be_apexrnd_aop_da.sql. This file contains the code to install the AOP plugin as a dynamic action in Oracle APEX.

Note: This plugin is what enables AOP to interact with your APEX application and dynamically generate documents from various components.
Step 3: Install the AOP Plugin in Oracle APEX
Now that you have the AOP files, the next step is to install the plugin into your APEX application.
- Log in to your Oracle APEX workspace.
- Go to Shared Components > Plugins.
- Click Import Plugin and upload the SQL file (
dynamic_action_plugin_be_apexrnd_aop_da.sql) from the plugin folder of the AOP package. - Once uploaded, you’ll need to provide the AOP URL and API Key. You can find your API key in the AOP Dashboard, as we discussed earlier. The default AOP URL is: https://api.apexofficeprint.com/.
- After configuring the plugin, click Install Plugin to finalize the process.
Now APEX is ready to use APEX Office Print for generating documents and reports!
Step 4: Create a Page for Printing
Let’s create a simple page in Oracle APEX that contains data you wish to print. This could be an Interactive Grid, Form, or any other component displaying data from your database.
Example:
Create an Interactive Grid that lists all suppliers. This grid will be the source of data for the report.
- Create a new Interactive Grid in your application.
2. Select the data source (e.g., Suppliers table) and add columns like Supplier Name, Contact Person, Email, etc.
Now, let’s add a PRINT button that, when clicked, will trigger the report generation via AOP.
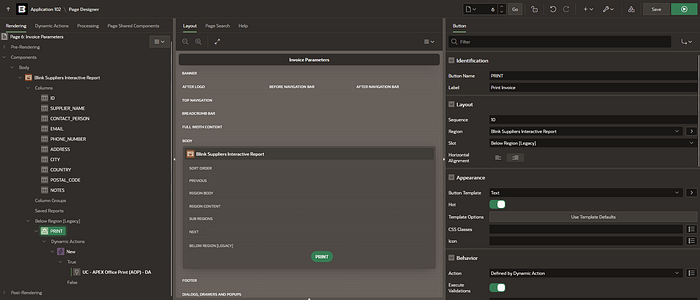
- Go to your page editor in Oracle APEX.
- Add a Button to the page, and label it Print.
- Under Behavior, add a Dynamic Action to this button.
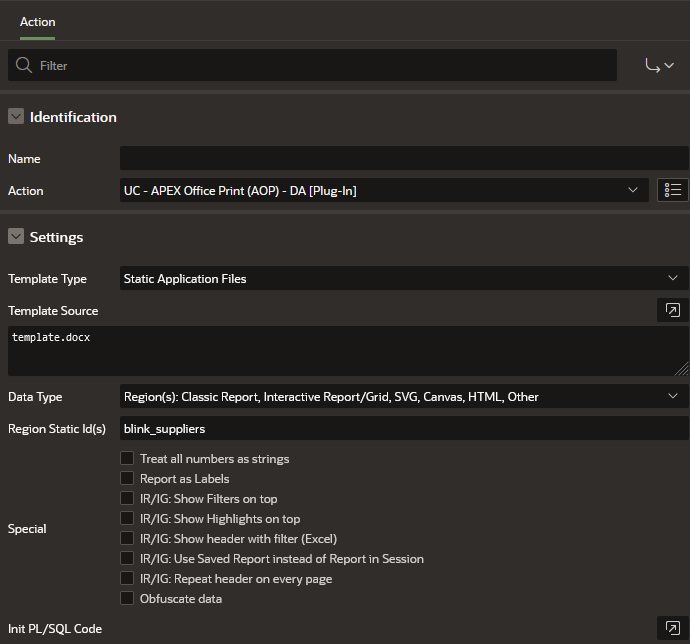
- In the True Action, choose the action UC — APEX Office Print (AOP) — DA [Plug-In].

This action allows you to configure how the document will be generated.
Key AOP Plugin Options:
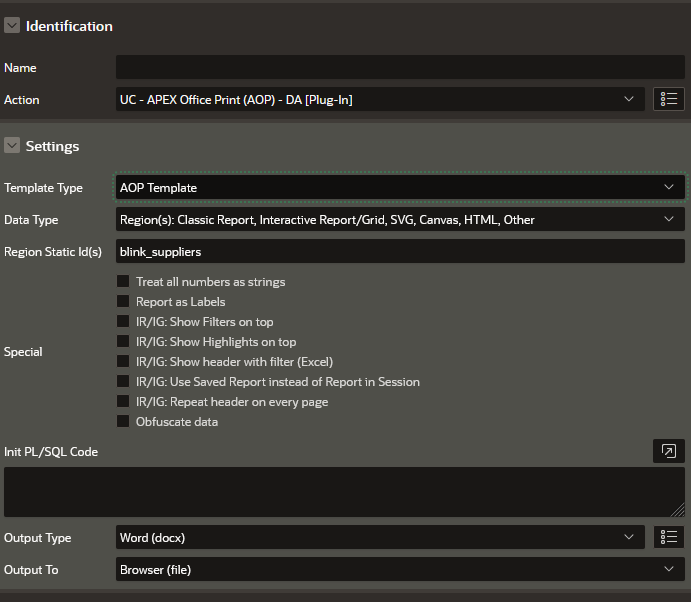
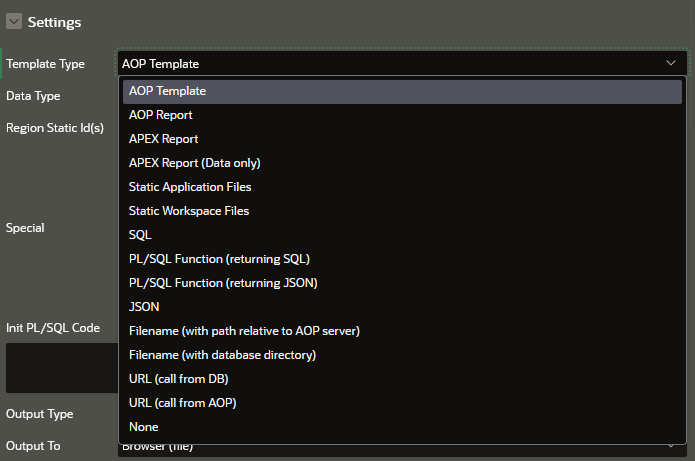
- Template Type:
- AOP Template: Select this option if you want to use a template stored within AOP. This is the most common use case where a
.docx,.xlsx, or.pdftemplate is stored and used to format your data dynamically. - AOP Report: Use this when you are not working with a pre-existing template but want to create the report directly using AOP’s report-building features.
- Static Application Files: If you’ve uploaded a custom template as a static file in your APEX application, select this option to pull the file directly from the shared components.
- SQL / PL/SQL Function: You can generate templates dynamically through SQL or PL/SQL functions.
- URL: Call templates from URLs if you’re storing them on external servers.
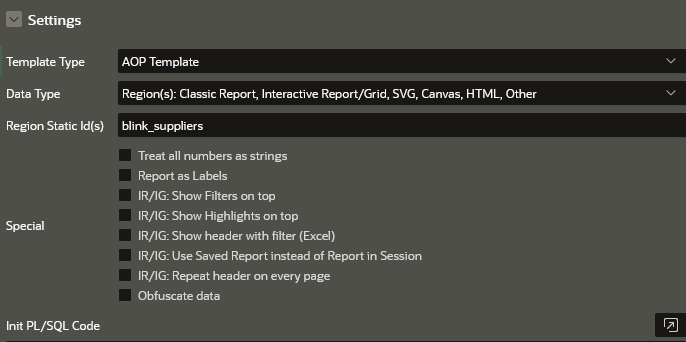
2. Data Type:
- Here, you specify the type of data you are working with. It could be an Interactive Grid, Classic Report, or SVG/Canvas/HTML.
- If you’re working with a specific region on the page, provide its Static ID in the
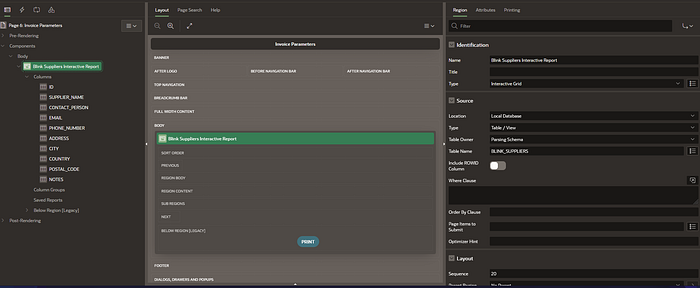
Region Static ID(s)field. - Example: If you are printing a Classic Report based on the data displayed on the page, you would enter the Static ID of the report region (e.g.,
blink_suppliersas seen in the first screenshot).
3. Special Options:
- Show Filters on Top: If you’re working with an Interactive Report, you can display filters at the top of the report in the generated document.
- Show Highlights on Top: Displays any conditional formatting highlights at the top of the report.
- Use Saved Report: Generates the document based on a saved state of the report in the session (useful for Interactive Reports that are customized by the user).
- Obfuscate Data: Use this option if you want to mask or anonymize sensitive data in the generated document.
4. Output Type:
- AOP supports multiple output types, which allow you to generate documents in different formats:
- PDF: Generates a PDF document.
- Word (docx): Generates a Word document, ideal for creating customizable, editable files.
- Excel (xlsx): Generates an Excel sheet, useful for exporting tabular data.
- HTML: Exports content as HTML if needed.
- You can choose the appropriate format depending on the use case. For example, Word is excellent for reports or letters that might need further editing, while PDF is best for finalized, uneditable documents.
5. Output To:
- Browser (File): This is the most common option where the document is generated and then downloaded by the user directly in the browser.
- URL: Send the document to a specified URL.
- Database: Store the generated document directly in your database (e.g., in a BLOB column).
- None: No output is generated; useful for testing or debugging.
6. Init PL/SQL Code:
- This field is available for custom PL/SQL code that you want to run during document generation. You can add logic here that preprocesses or manipulates data before generating the document.
Step 5. Create and Edit the AOP Template
Now, it’s time to create the document template that will format your report. AOP uses templates in .docx format that contain placeholders for dynamic content. This template acts as both a guide and an example, showing you how to format and loop over your data to generate dynamic reports. Here’s a breakdown of how to work with and customize this template to suit your specific needs. You can either start with a blank template or use the default AOP template.
For having an starting point first select for Template Type — AOP Template.
When running the application, you will see something like this:
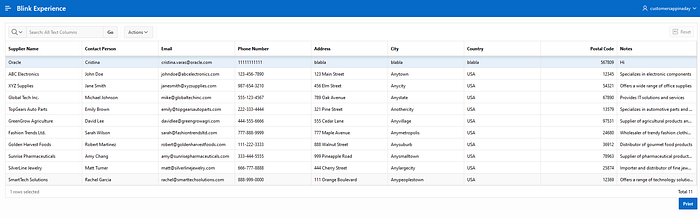
Click on Print button and a doc will be downloaded based on the data in the Interactive Grid:
As you can see in the pictures above, this is an example of a default Word template that AOP generates for you.
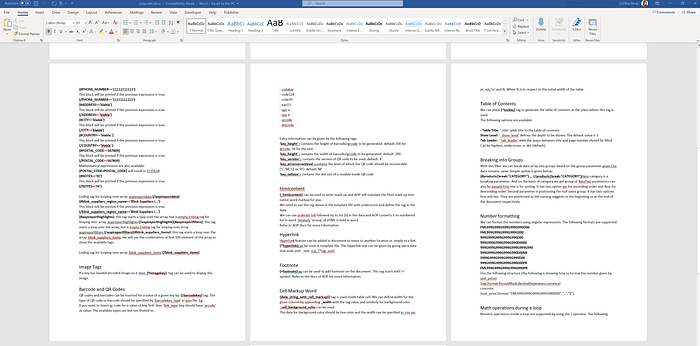
5.1. Understanding the Template Structure
The template is designed to give you a clear example of how to:
- Loop through your dataset using tags like
{#aopireportdata}. - Insert values dynamically from your APEX Interactive Report or other regions.
- Add any additional rows, columns, or fields by modifying the placeholders.
For instance, if you wanted to add a Postal Code column, you could insert a new column in the table and add {POSTAL_CODE} as a placeholder in the template. When the report is generated, AOP will automatically replace that placeholder with the actual postal code from your data.
5.2. Customizing the AOP Template
Now that you understand the basic structure of the template, we can customize it based on your specific needs. For example, you may want to adjust the layout, include additional columns, or format the data differently. Customization is easy because AOP allows you to:
- Add New Data Fields: If your APEX report or region includes additional data (like phone numbers or addresses), simply add more placeholders, such as
{PHONE_NUMBER}or{ADDRESS}. - Modify Loops: You can customize the way AOP loops over your data. In the template, the loop begins with
{#aopireportdata}and ends with{/aopireportdata}. Everything between these tags will be repeated for each record in your data set. You can insert additional fields or adjust the layout within this loop. - Formatting: You can apply different formatting styles to the template. AOP supports bold, italics, number formatting, and more. For example, you can format contact names to appear in bold by adding text formatting to the
{CONTACT_PERSON}placeholder in Word. - Add Conditional Logic: If you want to include conditional formatting or logic in the template, AOP supports this as well. For example, you can display certain data only when certain conditions are met (e.g., show only suppliers from a specific country).
5.3. Editing the Template
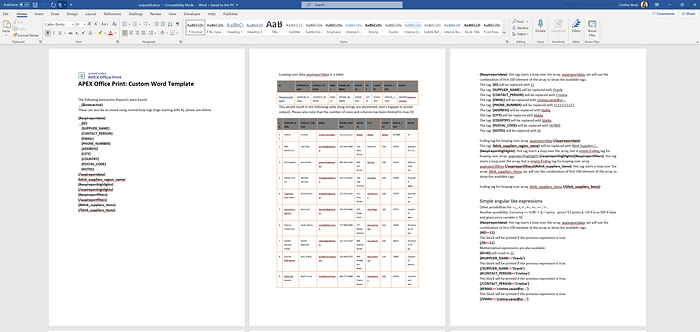
In this step, we’ll make some simple edits to the provided template, as shown in the picture:
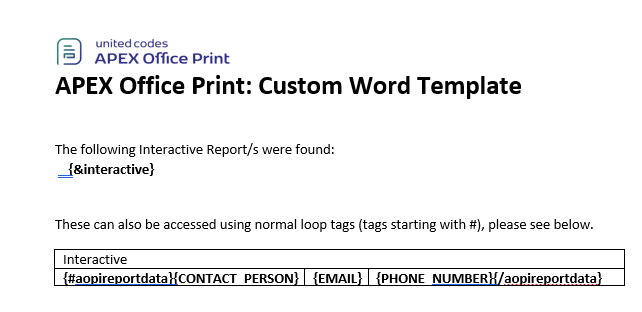
In this APEX Office Print (AOP) Custom Word Template, two different approaches are being used to display data: one table is generated using a placeholder for an Interactive Report, and the other uses loop tags to display data dynamically.
First Table: {&interactive}
The first part of the template uses the tag {&interactive}, which pulls data directly from an Interactive Report region in your Oracle APEX application. This approach is straightforward:
- {&interactive} acts as a placeholder for the entire Interactive Report that you have created in your APEX application.
- When the report is generated, AOP will automatically populate this placeholder with the data from the report, maintaining the format and content as displayed in your APEX app.
- This is useful for quickly embedding existing Interactive Reports without manually creating a table structure in the template.
Second Table: Generated with Loop Tags {#aopireportdata}
The second table is built using loop tags, allowing for more customization and flexibility:
- The tag
{#aopireportdata}starts a loop over the data set that is being passed to the template (in this case, supplier information). - Inside the loop, placeholders such as
{CONTACT_PERSON},{EMAIL}, and{PHONE_NUMBER}are used to display specific values from the data set. - The loop ends with
{/aopireportdata}, signaling the end of the iteration over the data rows.
Each row of the table will be repeated for every item in the data set, dynamically inserting values for Contact Person, Email, and Phone Number for each supplier, creating a table of information.
Step 7: Upload the Template to APEX
Once your template is ready, you need to upload it to APEX so that it can be used in the report generation process.
- Go to Shared Components > Static Application Files.
- Upload your
.docxfile.
Step 8: Link the Template to the Dynamic Action
Return to the Page Editor, where you created the PRINT button. In the Dynamic Action, set the Template Type to Static Application Files, and choose your uploaded .docx template in the Template Source.
At this point, you can also configure the Output Type to determine the format of the generated report (e.g., Word, PDF, Excel).
Results
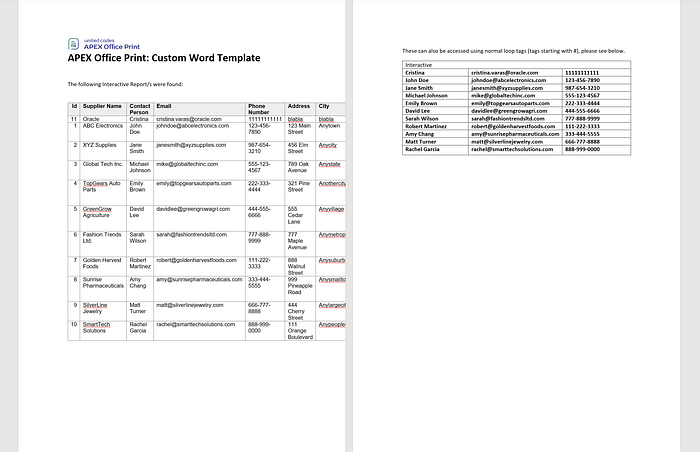
The final results demonstrate how APEX Office Print (AOP) can dynamically generate a table-based report from data within an Oracle APEX application. In this simple example, we see both an Interactive Report and a loop-generated table displaying supplier information, such as contact details and addresses. While functional, this report can be greatly enhanced by improving the layout, adjusting the table formatting, and adding visual elements like logos, color schemes, or additional styles. This flexibility allows you to create highly polished, professional reports tailored to your specific requirements.
Conclusion
In conclusion, we’ve just scratched the surface of what APEX Office Print can do! From basic table generation to full-blown custom reports, the possibilities are endless — especially with a bit of creativity and customization. Whether you’re building reports, invoices, or epic documents, AOP has your back!
Now, here comes the important part: Follow me for more APEX tips (you know you want to), activate those email notifications so you never miss a post, and of course — don’t hesitate to connect with me on LinkedIn. Let’s geek out over APEX, AI, and all things tech!
Looking forward to our next adventure! 😄