
Introduction
Welcome to this comprehensive guide on building an Oracle APEX application that integrates with OCI Data Science to make real-time predictions using a machine learning model.
This guide is divided into two parts:
- Part 1 (this article): We will focus on the data science aspect, including training a machine learning model, deploying it in OCI Data Science, and making it accessible via an API endpoint.
- Part 2: We will dive into Oracle APEX development, where we’ll build an interactive web application that calls the deployed model, sends input data, and displays predictions dynamically.
What you’ll learn in Part 1
In this first part, we will go step by step through:
- Fundamentals of Data Science and its role in modern applications.
- Training a model using the Iris dataset with the Scikit-learn (sklearn) library.
- Using Oracle’s ADS (Accelerated Data Science) SDK to streamline model management.
- Deploying the model in OCI Model Deployment to expose it as a REST API.
- Checking the deployment status and ensuring it is ready for integration.
Why you should stay for Part 2 🚀
In Part 2, we will use Oracle APEX to build a fully functional application that interacts with our deployed model. You’ll learn how to:
- Create an APEX UI for real-time predictions.
- Send input data to the model’s API endpoint.
- Process the response and display predictions dynamically.
- Customize the interface with charts, tables, and images.
So stay tuned! By the end of this series, you’ll have a complete AI-powered application built on Oracle APEX.
Now, let’s get started with training and deploying our machine learning model!
IMPORTANT — Prerequisites and OCI Policies
Before we start, ensure you have:
- An Oracle Cloud Infrastructure (OCI) account with Data Science services enabled.
- Necessary IAM policies and dynamic group rules in place to allow the notebook session to access OCI Model Deployment.
- Python environment with the required dependencies (included in OCI Data Science Notebook Sessions).
What is Data Science?
Data Science is an interdisciplinary field that combines statistics, programming, and domain expertise to extract insights and predictions from data. It involves:
- Data Collection: Gathering structured and unstructured data from various sources.
- Data Cleaning: Removing inconsistencies, missing values, and outliers.
- Exploratory Data Analysis (EDA): Understanding patterns, correlations, and distributions.
- Model Training: Applying machine learning algorithms to learn from data.
- Model Evaluation: Testing the model’s performance using accuracy metrics.
- Deployment: Making the model accessible for real-time predictions.
Why is Data Science Useful?
Data science is applied in various industries for:
- Fraud detection in finance
- Customer segmentation in marketing
- Predictive maintenance in manufacturing
- Healthcare diagnosis automation
- Supply chain optimization
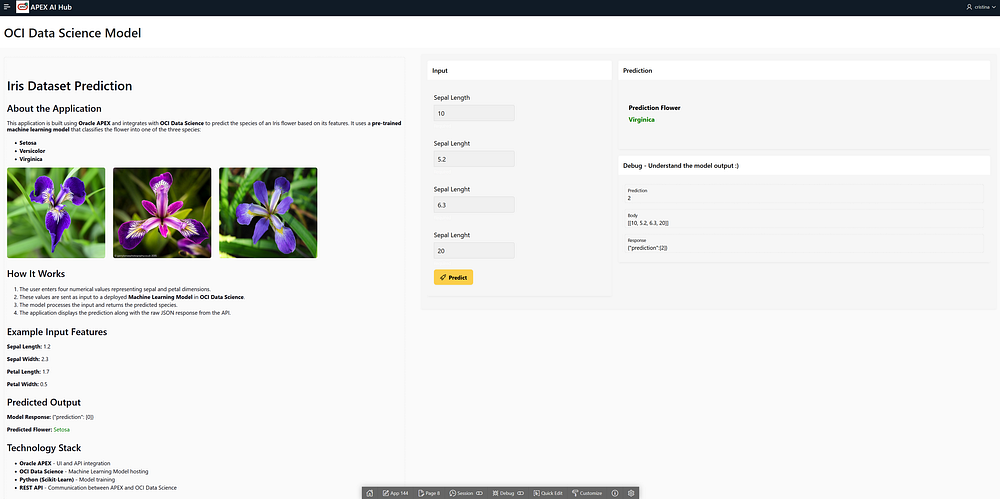
In this case, we will use Data Science in Oracle Cloud to train a machine learning model on the Iris dataset, deploy it to OCI Model Deployment, and consume predictions from an Oracle APEX application.
Understanding the Iris Dataset
The Iris dataset is one of the most famous datasets in machine learning. It contains:
- 150 samples of iris flowers
- 4 features: Sepal length, Sepal width, Petal length, and Petal width
- 3 classes: Setosa, Versicolor, and Virginica
We will train a classification model to predict the flower species based on the given features.
1. Training and Deploying the Model in OCI Data Science
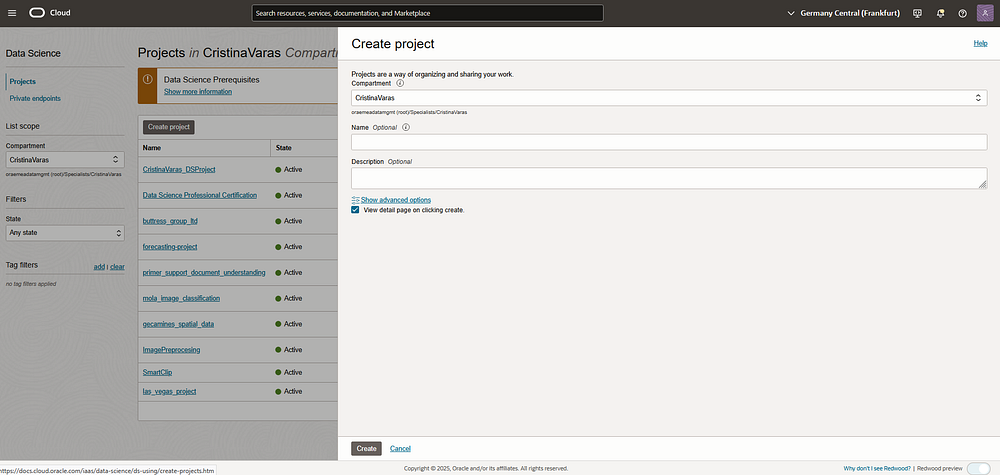
Step 1: Setting Up OCI Data Science
- Create a Data Science Project in the OCI Console:
- Navigate to the OCI Console → Data Science.
- Click on Projects and create a new Data Science Project.
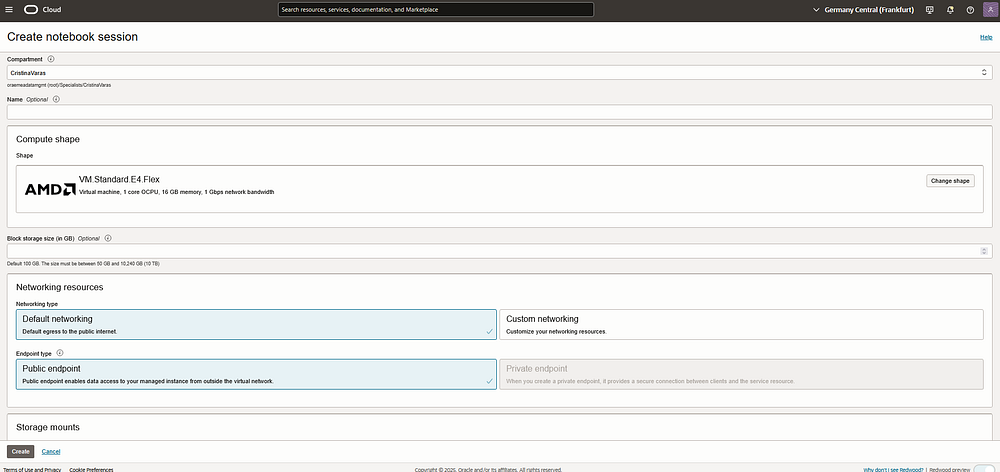
2. Create a Notebook Session:
- Inside your project, go to Notebook Sessions.
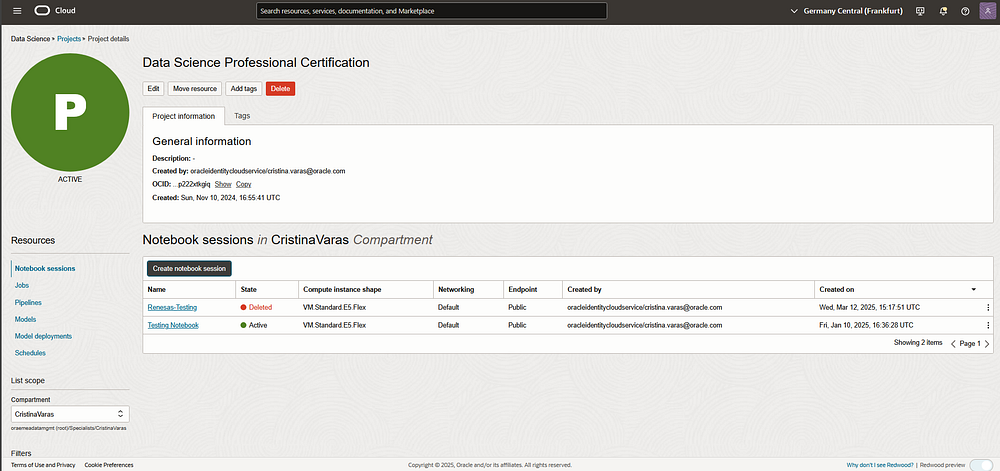
- Click Create Notebook Session and choose the desired compute shape.
Step 2: Train the Model in Jupyter Notebook
📢 Note: The full Jupyter Notebook will soon be available on GitHub for reference, but we will walk through the entire code step-by-step here.
- Set authentication for OCI
Authentication is essential in OCI Data Science to securely interact with cloud services like Model Catalog, Object Storage, and Model Deployment. Without proper authentication, the notebook cannot read, store, or deploy models in OCI.
Resource Principal is a secure authentication method that allows OCI-managed services (like Data Science Notebooks or Functions) to authenticate without using API keys or manual credentials. It enables the notebook to assume an identity and securely access OCI resources within the same tenancy.
Why use it?
- Secure and keyless authentication
- No need for manual credential configuration
- Ideal for serverless and cloud-native applications
import ads

# Set authentication
ads.set_auth("resource_principal")

# Check if authentication is set properly
print(ads.auth.default_signer())
ads.set_auth("resource_principal"): Authenticates our session with OCI.ads.auth.default_signer(): Verifies authentication is working correctly.
2. Import necessary libraries
Before we proceed with training and deploying our model, we need to import the required libraries.
import ads
import os
import tempfile
from ads.catalog.model import ModelCatalog
from ads.common.model import ADSModel
from ads.model.framework.sklearn_model import SklearnModel
from sklearn.ensemble import RandomForestClassifier
from sklearn.datasets import load_iris
from sklearn.model_selection import train_test_split
from ads.model.deployment import ModelDeployer, ModelDeploymentProperties
from ads.common.model_metadata import UseCaseType
- ads: Oracle’s Accelerated Data Science (ADS) SDK, which simplifies the end-to-end ML lifecycle in OCI, including training, deployment, and monitoring.
- sklearn: A widely used machine learning library, providing tools for data preprocessing, model training, and evaluation.
- load_iris: Loads the famous Iris dataset, which is commonly used for classification tasks.
- train_test_split: Splits the dataset into training and testing sets for model validation.
This code is executed inside Oracle Cloud Infrastructure (OCI) Data Science, which provides pre-configured Conda environments optimized for machine learning workloads. In this case, we are using the “generalml_p311_cpu_x86_64_v1” Conda environment, which includes:
- Pre-installed ADS SDK: Allows seamless interaction with OCI Data Science services.
- Scikit-learn and ML Libraries: Comes with commonly used ML libraries like scikit-learn, pandas, numpy, and more.
- Optimized for OCI Integration: Ensures compatibility with OCI Model Deployment, Model Catalog, and Object Storage without additional setup
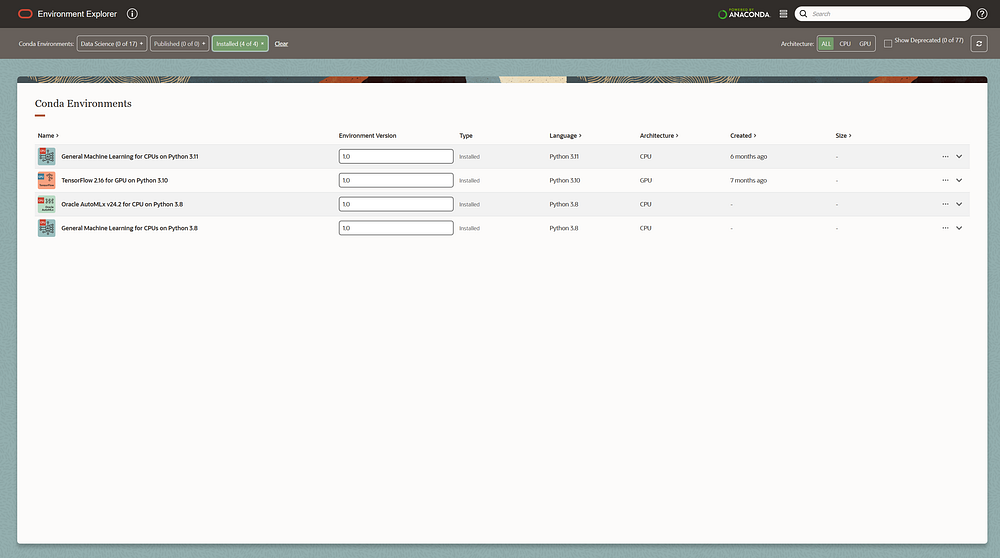
By using a managed Conda environment, we eliminate dependency issues and focus entirely on developing, training, and deploying our machine learning models.
3. Load the Iris dataset and preprocess data:
# Load dataset
iris = load_iris()
X_train, X_test, y_train, y_test = train_test_split(iris.data, iris.target, test_size=0.2, random_state=42)
iris = load_iris(): Loads the dataset containing features (X) and target labels (y).- Splitting data:
train_test_splitensures 80% training and 20% testing.
4. Train the RandomForest Model
# Train model
model = RandomForestClassifier(n_estimators=100)
model.fit(X_train, y_train)
- RandomForestClassifier: Uses 100 estimators (trees) to classify the iris species.
model.fit(X_train, y_train): The model learns from training data.
Step 3: Upload the Model to OCI Model Catalog
Instead of manually uploading the model via the OCI Console, we are using code to store the trained model in the OCI Model Catalog directly from our Jupyter Notebook. This ensures a more automated, scalable, and reproducible process.
- Save the Model in an Artifact Directory.
First, we wrap the trained RandomForestClassifier model into an OCI-compatible format using the ADS SklearnModel wrapper:
sk_model = SklearnModel(estimator=model, artifact_dir="./artifact")py
estimator=model: Passes our trained RandomForest model.artifact_dir="./artifact": Defines a local folder where model artifacts (e.g.,runtime.yaml,score.py, andmodel.pkl) will be stored before uploading to OCI.
2. Prepare the Model for Deployment
sk_model.prepare(
    inference_conda_env="automlx242_p38_cpu_x86_64_v1",  # Match the Conda env
    inference_python_version="3.8",  # Explicit Python version
    training_script_path=None,
    force_overwrite=True  # ✅ Add this to overwrite runtime.yaml
)
inference_conda_env="automlx242_p38_cpu_x86_64_v1"
- Specifies the OCI Conda environment used for model inference.
- This ensures the same Python packages are available at deployment.
inference_python_version="3.8"
- Explicitly sets the Python version required to run the model.
- Ensures compatibility when executing predictions.
force_overwrite=True
- Overwrites existing
runtime.yaml(which defines the model runtime). - Prevents conflicts if re-running the notebook.
3. Save and Upload the Model to OCI Model Catalog
sk_model.save(
    name="iris_model",
    overwrite=True,
    force_overwrite=True,
    metadata={"custom_metadata": "Random Forest trained on Iris dataset"}  # ✅ Ensure values are strings
)
name="iris_model"
- Defines the model name in OCI Model Catalog.
overwrite=True, force_overwrite=True
- Ensures existing model files are replaced when re-running the script.
metadata={"custom_metadata": "Random Forest trained on Iris dataset"}
- Adds metadata for better tracking (all values must be strings).
- This metadata is stored in OCI for future reference.
Now he model (iris_model.pkl) is automatically uploaded to OCI Model Catalog. It’s now available for deployment as an API endpoint in OCI Model Deployment. No need to manually click buttons in the OCI Console — everything is automated!
Step 4: Deploy the Model as an API Endpoint
Now that we have our trained model stored in OCI Model Catalog, the next step is to deploy it as an API endpoint. This allows external applications — like our Oracle APEX app — to send requests and get real-time predictions.
1. Define Required OCI Identifiers
Before deployment, we need to specify the Compartment, Project, and Model OCIDs:
COMPARTMENT_ID = "ocid1.compartment.oc1..[REDACTED]"
PROJECT_ID = "ocid1.datascienceproject.oc1..[REDACTED]"
MODEL_ID = "ocid1.datasciencemodel.oc1..[REDACTED]"
COMPARTMENT_ID→ The OCI compartment where resources (model, deployment) are stored.PROJECT_ID→ The Data Science Project ID, linking the deployment to our existing ML workspace.MODEL_ID→ The saved model’s OCID from OCI Model Catalog, specifying which model to deploy.
2. Configure the Model Deployment
Now, we define the deployment properties, such as compute resources and instance details:
deployment_properties = (
    ModelDeploymentProperties(MODEL_ID)
    .with_prop("display_name", "Sklearn Model Deployment - Iris Dataset")
    .with_prop("project_id", PROJECT_ID)
    .with_prop("compartment_id", COMPARTMENT_ID)
    .with_instance_configuration(
        config={
            "INSTANCE_SHAPE": "VM.Standard.E4.Flex",  # Compute instance type
            "INSTANCE_COUNT": 1,  # Number of instances
            "bandwidth_mbps": 10,  # Network bandwidth
            "memory_in_gbs": 10,  # RAM allocated
            "ocpus": 2,  # Number of CPU cores
        }
    )
)
Model Metadata:
"display_name"→ Sets a user-friendly name for the deployment."project_id","compartment_id"→ Links deployment to OCI Project and Compartment.
Compute Resources:
"INSTANCE_SHAPE"→ Defines the virtual machine (VM) type."INSTANCE_COUNT"→ Number of running instances (typically 1 for small models)."memory_in_gbs","ocpus"→ Specifies RAM and CPU allocation."bandwidth_mbps"→ Defines network bandwidth.
3. Deploy the Model
Now, we trigger the deployment:
deployer = ModelDeployer()
deployment_info = deployer.deploy(deployment_properties)
ModelDeployer() → Initializes the deployment process.
.deploy(deployment_properties) → Deploys the model based on the defined configuration.
To ensure the model is running, we check the deployment status:
# Replace with your model deployment OCID
model_deployment_id = "ocid1.datasciencemodeldeployment.oc1..[REDACTED]"

# Check deployment status
deployment = ModelDeployment.from_id(model_deployment_id)
print("Deployment Status:", deployment.status)
Retrieves the deployment using ModelDeployment.from_id(model_deployment_id).
Prints deployment status, which can be:
ACTIVE→ Model is running and ready to accept API requests.DEPLOYING→ Model is still initializing.FAILED→ There was an issue during deployment.
Step 5: Testing the deployed Model in Python
Before integrating our model into Oracle APEX, we first need to verify that the deployed model works by making an API request in Python. This ensures that our deployment is successful and that we understand how to send input and process the response.
1. Initialize the OCI Data Science Client
We start by setting up authentication and retrieving all available deployments. This involves setting authentication using Resource Principal, getting the compartment ID, and initializing the Data Science Client. Once the client is set up, we list all model deployments within the current OCI compartment and print their names and OCIDs for reference.
from oci.data_science import DataScienceClient
import ads
import os

# ✅ Set authentication
ads.set_auth("resource_principal")

# ✅ Get compartment ID
compartment_id = os.getenv("NB_SESSION_COMPARTMENT_OCID")

# ✅ Initialize Data Science Client
ds_client = DataScienceClient(config={}, signer=ads.auth.default_signer()["signer"])

# ✅ List all model deployments
deployments = ds_client.list_model_deployments(compartment_id=compartment_id)

# ✅ Print all available deployments
for deployment in deployments.data:
    print(f"Deployment Name: {deployment.display_name}, OCID: <ocid>")
2. Retrieve Deployment Details
Once we identify the correct deployment, we extract its API URL. We do this by specifying the deployment ID (which should be retrieved from the previous step) and calling the get_model_deployment method. The response provides the model deployment URL, which will be used to send prediction requests.
# ✅ Define Deployment ID (Anonymized)
deployment_id = "ocid1.datasciencemodeldeployment.oc1.[ANONYMIZED]"

# ✅ Get model deployment details
deployment_details = ds_client.get_model_deployment(deployment_id)
deployment_url = deployment_details.data.model_deployment_url

print(f"✅ Model Deployment URL: [ANONYMIZED]")
3. Sending a Prediction Request
Now, we send input data to the model and receive a prediction. To do this, we define the model’s endpoint URL and structure the input data in the expected JSON format. The output will be a printingo of the response or error message for debugging.
import requests
import json

# Define Your Model Deployment URL (Anonymized)
endpoint = "https://modeldeployment.[ANONYMIZED].oci.customer-oci.com/ocid1.datasciencemodeldeployment.oc1.[ANONYMIZED]"

# Define Input Data (Update as Needed)
input_data = [[5.1, 3.5, 1.4, 0.2]]  # Adjust this according to your model's expected format

# Choose Authentication Method
use_rps = True  # Set to False if using API key authentication

# Set Headers
headers = {
    "Content-Type": "application/json"
}

# Make the API Call
try:
    response = requests.post(endpoint + "/predict", headers=headers, json=input_data, auth=auth)

    if response.status_code == 200:
        print("✅ Prediction Success:", response.json())
    else:
        print(f"❌ Error {response.status_code}: {response.text}")

except Exception as e:
    print(f"🚨 Exception Occurred: {e}")

🚀 Next Steps: Integrating with Oracle APEX
Now that we have verified that the model works, we can move on to Part 2, where we will:
- Build an Oracle APEX application.
- Integrate this API to send requests from APEX.
- Display predictions in a user-friendly format.
- Implement error handling and logging for reliability.
- Optimize API calls for performance and scalability.
If you enjoyed this, follow me on Medium and connect with me on LinkedIn for more tutorials on AI, OCI, and APEX development!
Happy coding! 🙂