
In this article, I will walk you through how to create a ChatGPT-like interface in Oracle APEX using a fine-tuned OpenAI model. This guide covers how to set up the chat interface, connect to the fine-tuned model, and handle API calls to OpenAI for generating responses based on user inputs. We will also discuss how to initialize collections and store user prompts and AI responses.
For those interested in the fine-tuning process itself, I previously explained how to fine-tune a model in detail in this article on Medium. You may want to review that first to understand how to create your own specialized model before diving into the integration steps here.
1. Setting Up the Environment
First, ensure your Oracle APEX environment is ready for integrating OpenAI. I fine-tuned a custom model using OpenAI’s GPT-4 for Oracle APEX 24.1 documentation. This model is deployed and called using REST API in APEX. Here’s what you’ll need to proceed:
- Oracle APEX version 24.1 or later
- Access to OpenAI API (API key and fine-tuned model)
- Basic understanding of PL/SQL, REST API, and APEX collections.
2. Preparing the Data Structures
You’ll need to set up the following tables to manage user prompts and AI responses. In my case, I created tables like CLOUD_COACH_OPENAI_PROMPTS and CC_SETTINGS.
CLOUD_COACH_OPENAI_PROMPTS Table:
- ID: Primary key
- USER_PROMPT: Stores the user’s prompt
- AI_RESPONSE: Stores the AI’s response
- CREATED_AT: Timestamp when the interaction occurred
- USER_ID: ID of the user who submitted the prompt
CC_SETTINGS Table:
- ID: Primary key
- SETTING: Setting name (e.g., “Welcome bot message”)
- VALUE: The value for the setting (e.g., the welcome message text)
These tables are used to initialize and store chat interactions, settings, and configurations for the app.
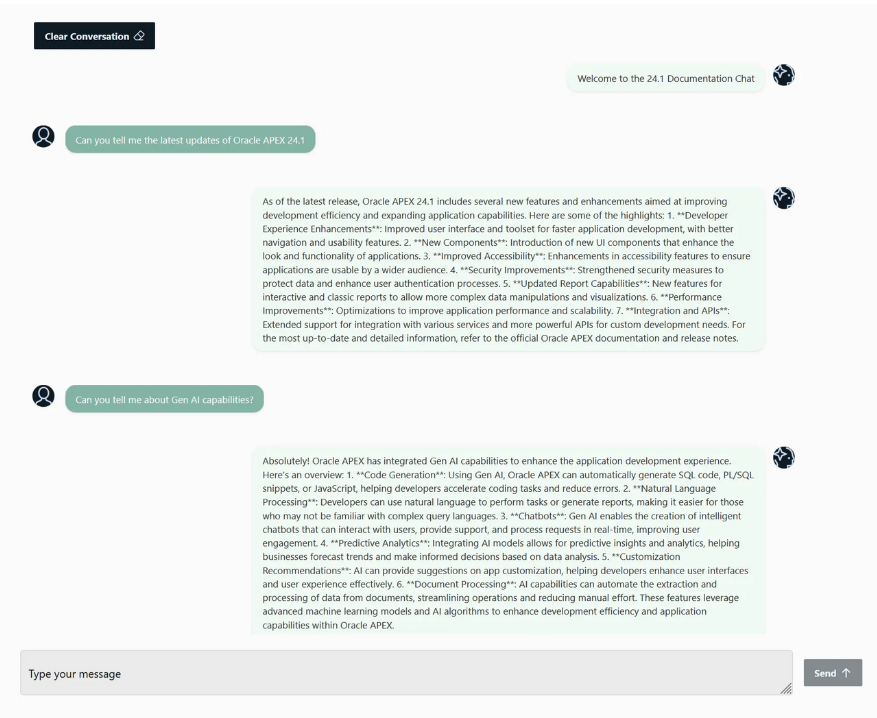
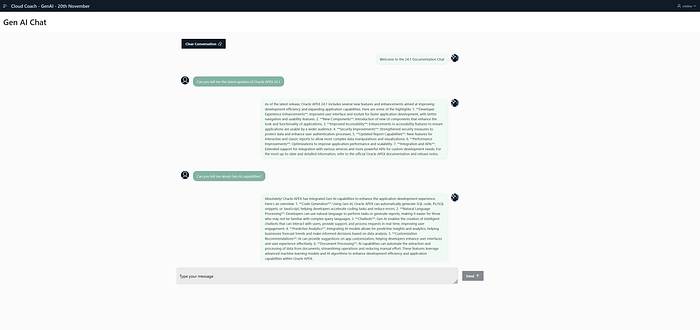
3. Designing the Chat Interface in Oracle APEX
Oracle APEX provides a robust platform for creating dynamic UIs. In the case of our chat interface, we designed it to mimic modern messaging apps with features like input fields, message bubbles, and a conversation area.
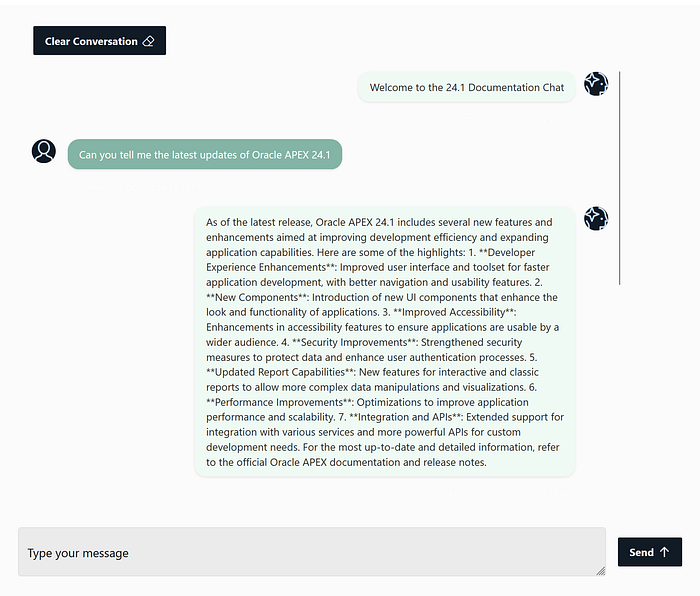
Key UI Elements:
- Chat Region: This region displays the conversation history in a scrollable format. Each message from the user and the AI is presented as a bubble for an intuitive, conversational flow.
- Input Box: Located at the bottom of the page, this is where the user types their message.
- Send Button: A button that the user clicks to send the message. We also bind the “Enter” key to trigger the message submission for a seamless chat experience.
- Clear Conversation Button: This button clears the entire conversation, allowing users to reset the chat.
In the screenshot you provided, the chat interface looks modern, with messages displayed clearly, and a well-designed input area.
3.1. Dynamic Actions for interactivity
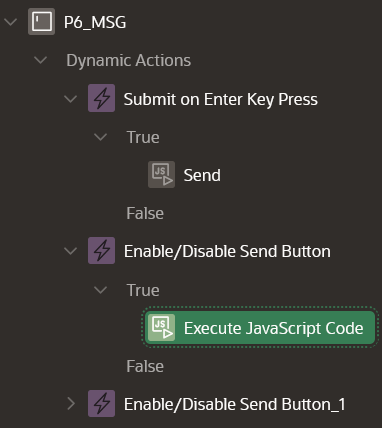
- Submit on ‘Enter’ Key Press: To mimic real-time chat, users can press ‘Enter’ to send their message instead of manually clicking the “Send” button.
event.preventDefault(); // Prevent form submission
document.getElementById('post-message-btn')java.click();
2. Enable/Disable Send Button: The ‘Send’ button should only be enabled when there is a valid message in the input field. This prevents users from submitting empty messages.
var textField = document.getElementById('P6_MSG');
var sendButton = document.getElementById('post-message-btn');

textField.addEventListener('input', function() {
    if (textField.value.trim() === '' || textField.value.trim() === 'Type your message') {
        sendButton.disabled = true;
    } else {
        sendButton.disabled = false;
    }
});
3.2. Initializing the Chat and Storing Messages
Each conversation between the user and the AI is stored in APEX collections. This ensures that chat history can be dynamically managed within the session. Here’s how we initialize the chat:
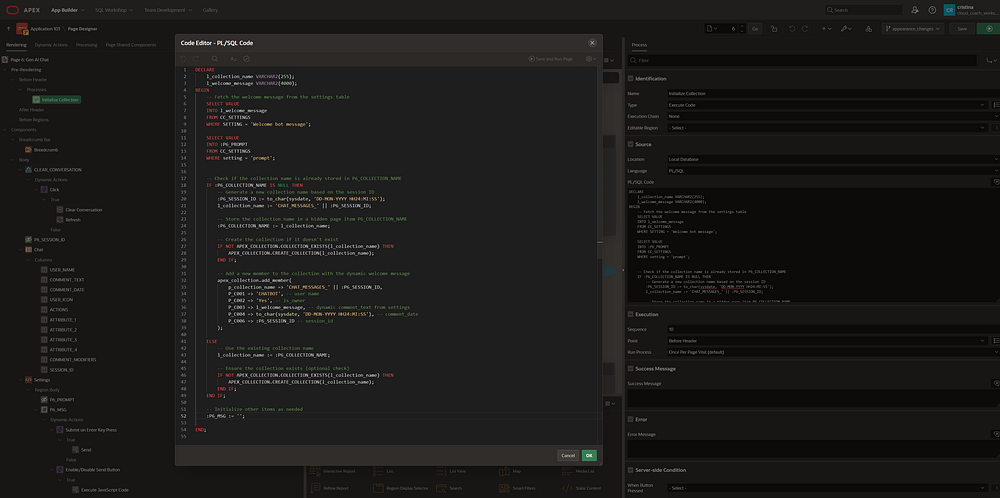
1. PL/SQL Code to Initialize the Collection:
This process runs when the chat page loads, initializing the conversation and adding a welcome message from the AI.
DECLARE
    l_collection_name VARCHAR2(255);
    l_welcome_message VARCHAR2(4000);
BEGIN
    -- Fetch the welcome message from the settings table
    SELECT VALUE
    INTO l_welcome_message
    FROM CC_SETTINGS
    WHERE SETTING = 'Welcome bot message';

    SELECT VALUE
    INTO :P6_PROMPT
    FROM CC_SETTINGS
    WHERE setting = 'prompt';

    -- Generate a new collection name based on the session ID
    IF :P6_COLLECTION_NAME IS NULL THEN
        :P6_SESSION_ID := to_char(sysdate, 'DD-MON-YYYY HH24:MI:SS');
        l_collection_name := 'CHAT_MESSAGES_' || :P6_SESSION_ID;

        :P6_COLLECTION_NAME := l_collection_name;

        -- Create the collection if it doesn't exist
        IF NOT APEX_COLLECTION.COLLECTION_EXISTS(l_collection_name) THEN
            APEX_COLLECTION.CREATE_COLLECTION(l_collection_name);
        END IF;

        -- Add the welcome message to the collection
        apex_collection.add_member(
            p_collection_name => 'CHAT_MESSAGES_' || :P6_SESSION_ID,
            P_C001 => 'CHATBOT',
            P_C002 => 'Yes',
            P_C003 => l_welcome_message,
            P_C004 => to_char(sysdate, 'DD-MON-YYYY HH24:MI:SS'),
            P_C006 => :P6_SESSION_ID
        );
    END IF;

    -- Initialize the message input field
    :P6_MSG := '';
END;
This code ensures that a new session starts with a welcome message from the AI, and it sets up the collection to store the subsequent conversation.
3.3. Handling User Input and Sending Messages
When the user types a message, it needs to be processed and sent to the AI. Here’s how that works in the background.
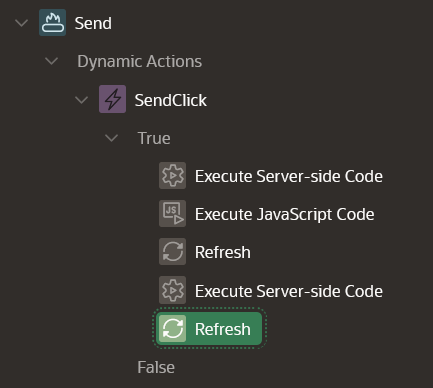
1. Server-Side Code to Store the User’s Message:
Upon clicking the ‘Send’ button (or pressing ‘Enter’), the following PL/SQL code runs to store the user’s message and clear the input field:
begin
  apex_collection.add_member(p_collection_name => :P6_COLLECTION_NAME,
                             P_C001 => :APP_USER,
                             P_C002 => 'No',
                             P_C003 => :P6_MSG,
                             P_C004 => to_char(sysdate, 'DD-MON-YYYY HH24:MI:SS'),
                             P_C006 => :P6_SESSION_ID);

  :P6_MSG_HIDDEN := :P6_MSG;  -- Move the message to a hidden item
  :P6_MSG := '';  -- Clear the input field
end;
2. JavaScript Code to Handle the Input UI:
The input field needs to be cleared and re-enabled for the next message:
apex.item("P6_MSG").setValue("");
apex.item("P6_MSG").enable();
apex.item("P6_MSG").setFocus();
These actions ensure that the user can quickly type and send the next message without having to manually reset the input field.
3.4. Making an API Call to OpenAI
Now that the user’s message is processed, we make a REST API call to OpenAI to get the AI’s response.
PL/SQL Code to Call OpenAI’s API:
This PL/SQL code uses APEX’s MAKE_REST_REQUEST function to send the message to OpenAI and retrieve the response:
DECLARE
    l_response CLOB;
    l_body VARCHAR2(4000);
BEGIN
    -- Set the request headers
    apex_web_service.g_request_headers (1).name := 'Content-Type';
    apex_web_service.g_request_headers (1).value := 'application/json';

    -- Build the message body for the API call
    l_body := '{
        "model": "ft:gpt-4o-2024-08-06:personal:apex-tuned-model:AEDdUDxT",
        "messages": [
            {"role": "system", "content": "You are an Oracle APEX assistant."},
            {"role": "user", "content": "' || :P6_MSG_HIDDEN || '"}
        ]
    }';

    -- Make the API call to OpenAI
    l_response := APEX_WEB_SERVICE.MAKE_REST_REQUEST(
        p_url => 'https://api.openai.com/v1/chat/completions',
        p_http_method => 'POST',
        p_body => l_body,
        p_credential_static_id => 'OpenAI_Credentials'
    );

    -- Store the AI's response
    :P6_AI_RESPONSE := l_response;

    -- Extract the AI's message content
    :P6_AI_CLEAN_RESPONSE := JSON_VALUE(l_response, '$.choices[0].message.content');

    -- Add the AI's response to the collection
    apex_collection.add_member(
        p_collection_name => :P6_COLLECTION_NAME,
        P_C001 => 'CHATBOT',
        P_C002 => 'Yes',
        P_C003 => :P6_AI_CLEAN_RESPONSE,
        P_C004 => to_char(sysdate, 'DD-MON-YYYY HH24:MI:SS'),
        P_C006 => :P6_SESSION_ID
    );
END;
In this code, the user’s message is sent to OpenAI, and the response is parsed and stored in the P6_AI_CLEAN_RESPONSE item, ready to be displayed in the chat interface.
4. Creating OpenAI Credentials in Oracle APEX
To make the API call, we need to securely store the OpenAI API key using APEX’s Web Credentials feature.
- Go to Workspace Utilities > Web Credentials.
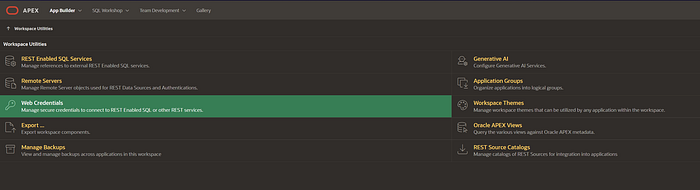
2. Click on Create and enter the API key for OpenAI.
3. Assign a static ID to the credential (e.g., OpenAI_Credentials), which will be referenced in your PL/SQL code for the API call.
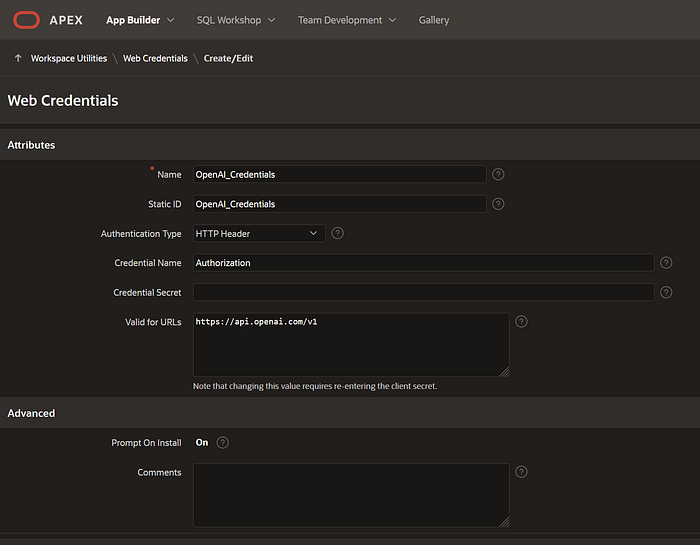
This ensures that your API key is stored securely and can be accessed when needed to make the request.
Conclusion
In this guide, we’ve outlined the steps to build a ChatGPT-like interface within Oracle APEX, utilizing OpenAI’s fine-tuned model to enhance user interaction. From setting up the environment and defining data structures to designing the chat UI and managing the API calls, each step is geared toward creating a seamless, interactive experience that closely mimics real-time conversation. This project showcases how Oracle APEX’s flexibility allows developers to integrate advanced AI capabilities, providing a custom chatbot experience powered by OpenAI.
A special thanks goes to Roxana Popa, whose invaluable assistance in the app’s development made this integration possible. Her contributions helped refine the user interface and ensured smooth functionality across various elements of the chat interface, creating a more intuitive experience for users.
With Oracle APEX and OpenAI, the possibilities for creating tailored, intelligent applications are vast. As AI continues to evolve, incorporating such models will become essential for enhancing user engagement and delivering personalized solutions across different industries.
If you found this guide helpful and want to stay updated on more Oracle APEX tips, AI integrations, and other tech insights, feel free to follow me on LinkedIn! I’ll be sharing more tutorials, updates, and news to keep you in the loop on the latest developments. Let’s connect, and stay tuned for more exciting content! 😊